Navigating Files and Directories
Getting started
The first thing we need to do is log in to our cloud instance.
1. Open the cloudspan folder you created for the course
Open your file manager and navigate to the cloudspan folder (hint: we recommended you make the folder in your Desktop directory - but you might have made it somewhere else). If you cannot find the folder, you can remind yourself where it is stored by looking at the absolute path you wrote down in the previous episode.
The folder should contain the login key file we downloaded in the previous episode and nothing else.
2. Right-click and open your machine’s command line interface
Now we can open the command line.
Windows users:
- Right click anywhere inside the blank space of the file manager, then select Git Bash Here. A new window will open - this is your command line interface, also known as the shell or the terminal. It will automatically open with your
cloudspandirectory as the working directory.
- Right click anywhere inside the blank space of the file manager, then select Git Bash Here. A new window will open - this is your command line interface, also known as the shell or the terminal. It will automatically open with your
Mac users, you have two options:
EITHER: Open Terminal in one window and type
cdfollowed by a space. Do not press enter! Now open Finder in another window. Drag and drop thecloudspanfolder from the Finder to the Terminal. You should see the file path leading to yourcloudspanfolder appear. Now press enter to navigate to the folder.OR: Open Terminal and type
cdfollowed by the absolute path that leads to yourcloudspanfolder. Press enter.
3. Login into your instance
Code
ssh -i login-key-instanceNNN.pem csuser@instanceNNN.cloud-span.aws.york.ac.ukBe sure to replace NNN with your own number, twice.
Reminder: our file structure
Before we start, here’s a reminder of what our file structure looks like as a hierarchy tree:
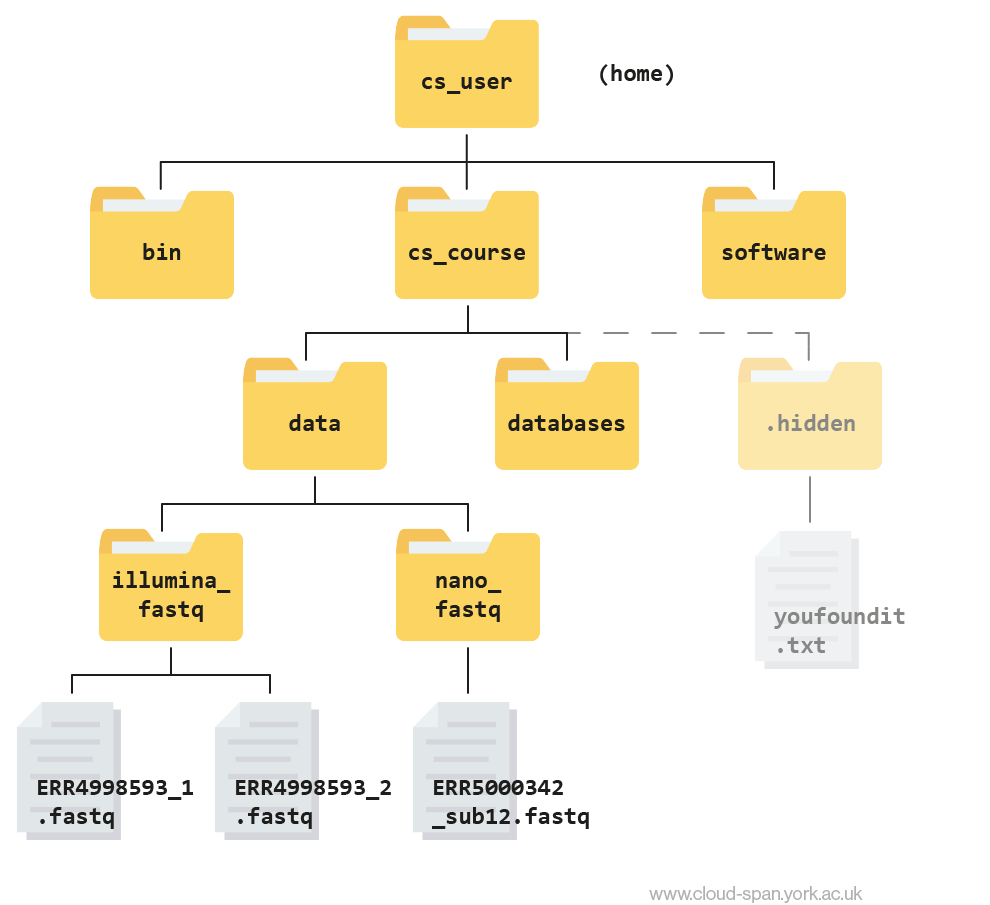
Keep this in mind as we continue to navigate the file system, and don’t hesitate to refer back to it if needed.
Examining the contents of other directories
In the previous session we learned how to use pwd to find our current location within our file system. We also learned how to use cd to change locations and ls to list the contents of a directory.
By default, the ls commands lists the contents of the working directory (i.e. the directory you are in). You can always find the directory you are in using the pwd command. However, you can also give ls the names of other directories to view. Navigate to your home directory if you are not already there.
Code
cdThen enter the command:
Code
ls cs_courseOutput
data databasesThis will list the contents of the cs_course directory without you needing to navigate there.
The cd command works in a similar way.
Try entering:
Code
cd
cd cs_course/data/
This will take you to the data directory without having to go through the intermediate cs_course directory.
Navigate to your home directory. From there, list the contents of the illumina_fastq directory.
Code
cd
ls cs_course/data/illumina_fastq
Output
ERR4998593_1.fastq ERR4998593_2.fastqFull vs. Relative Paths
The cd command takes an argument which is a directory name. Directories can be specified using either a relative path or a full absolute path. The directories on the computer are arranged into a hierarchy. The full path tells you where a directory is in that hierarchy. Navigate to the home directory, then enter the pwd command.
Code
cd
pwd
You will see:
Output
/home/csuserThis is the full name of your home directory. This tells you that you are in a directory called csuser, which sits inside a directory called home which sits inside the very top directory in the hierarchy. The very top of the hierarchy is a directory called / which is usually referred to as the root directory. So, to summarize: csuser is a directory in home which is a directory in /. More on root and home in the next section.
Now enter the following command:
Code
cd /home/csuser/cs_course/.hiddenThis jumps forward multiple levels to the .hidden directory. Now go back to the home directory.
Code
cdYou can also navigate to the .hidden directory using:
Code
cd cs_course/.hiddenThese two commands have the same effect - they both take us to the .hidden directory. The first uses the absolute path, giving the full address from the root directory /. The second uses a relative path, giving only the address from the working directory. A absolute (full) path always starts with a /. A relative path does not.
You can usually use either a full path or a relative path depending on what is most convenient. If you want to reach a directory further down the same branch as your current working directory, it’s easiest to use the relative path since it involves less typing. If you’re trying to get to a directory in a different branch, it might be more convenient to use the full path instead of navigating “backwards” and then forwards.
Over time, it will become easier for you to keep a mental note of the structure of the directories that you are using and how to quickly navigate amongst them. We will be using the same directory structure for this whole course so navigating it should get easier as you progress.
Using the file system diagram below, if pwd displays /home/csuser/cs_course/data/illumina_fastq, what will ls ../nano_fastq display?
Can you explain why?
Output
ERR5000342_sub12.fastqThe command ls .. moves us up a folder level before we list the contents of nano_fastq.