Writing Scripts and Working with Data
Overview
Teaching: 20 min
Exercises: 20 minQuestions
How can we automate a commonly used set of commands?
Objectives
Use the
nanotext editor to modify text files.Write a basic shell script.
Use the
bashcommand to execute a shell script.Use
chmodto make a script an executable program.
Welcome to the Cloud-SPAN AWS instance!
In the first session we logged onto the Cloud for the first time. Today (and in subsequent sessions) we will be exploring this instance further and examining some of the data it holds.
As a reminder, we log in by launching Git Bash or Terminal from the cloudspan folder we made, and then using our ssh command. Take a look at the full set of instructions if you have forgotten how to do any of this.
$ ssh -i login-key-instanceNNN.pem csuser@instanceNNN.cloud-span.aws.york.ac.uk
The instance is exactly the same as the one used in our Prenomics course, so you may have explored it already. The file structure looks like this:
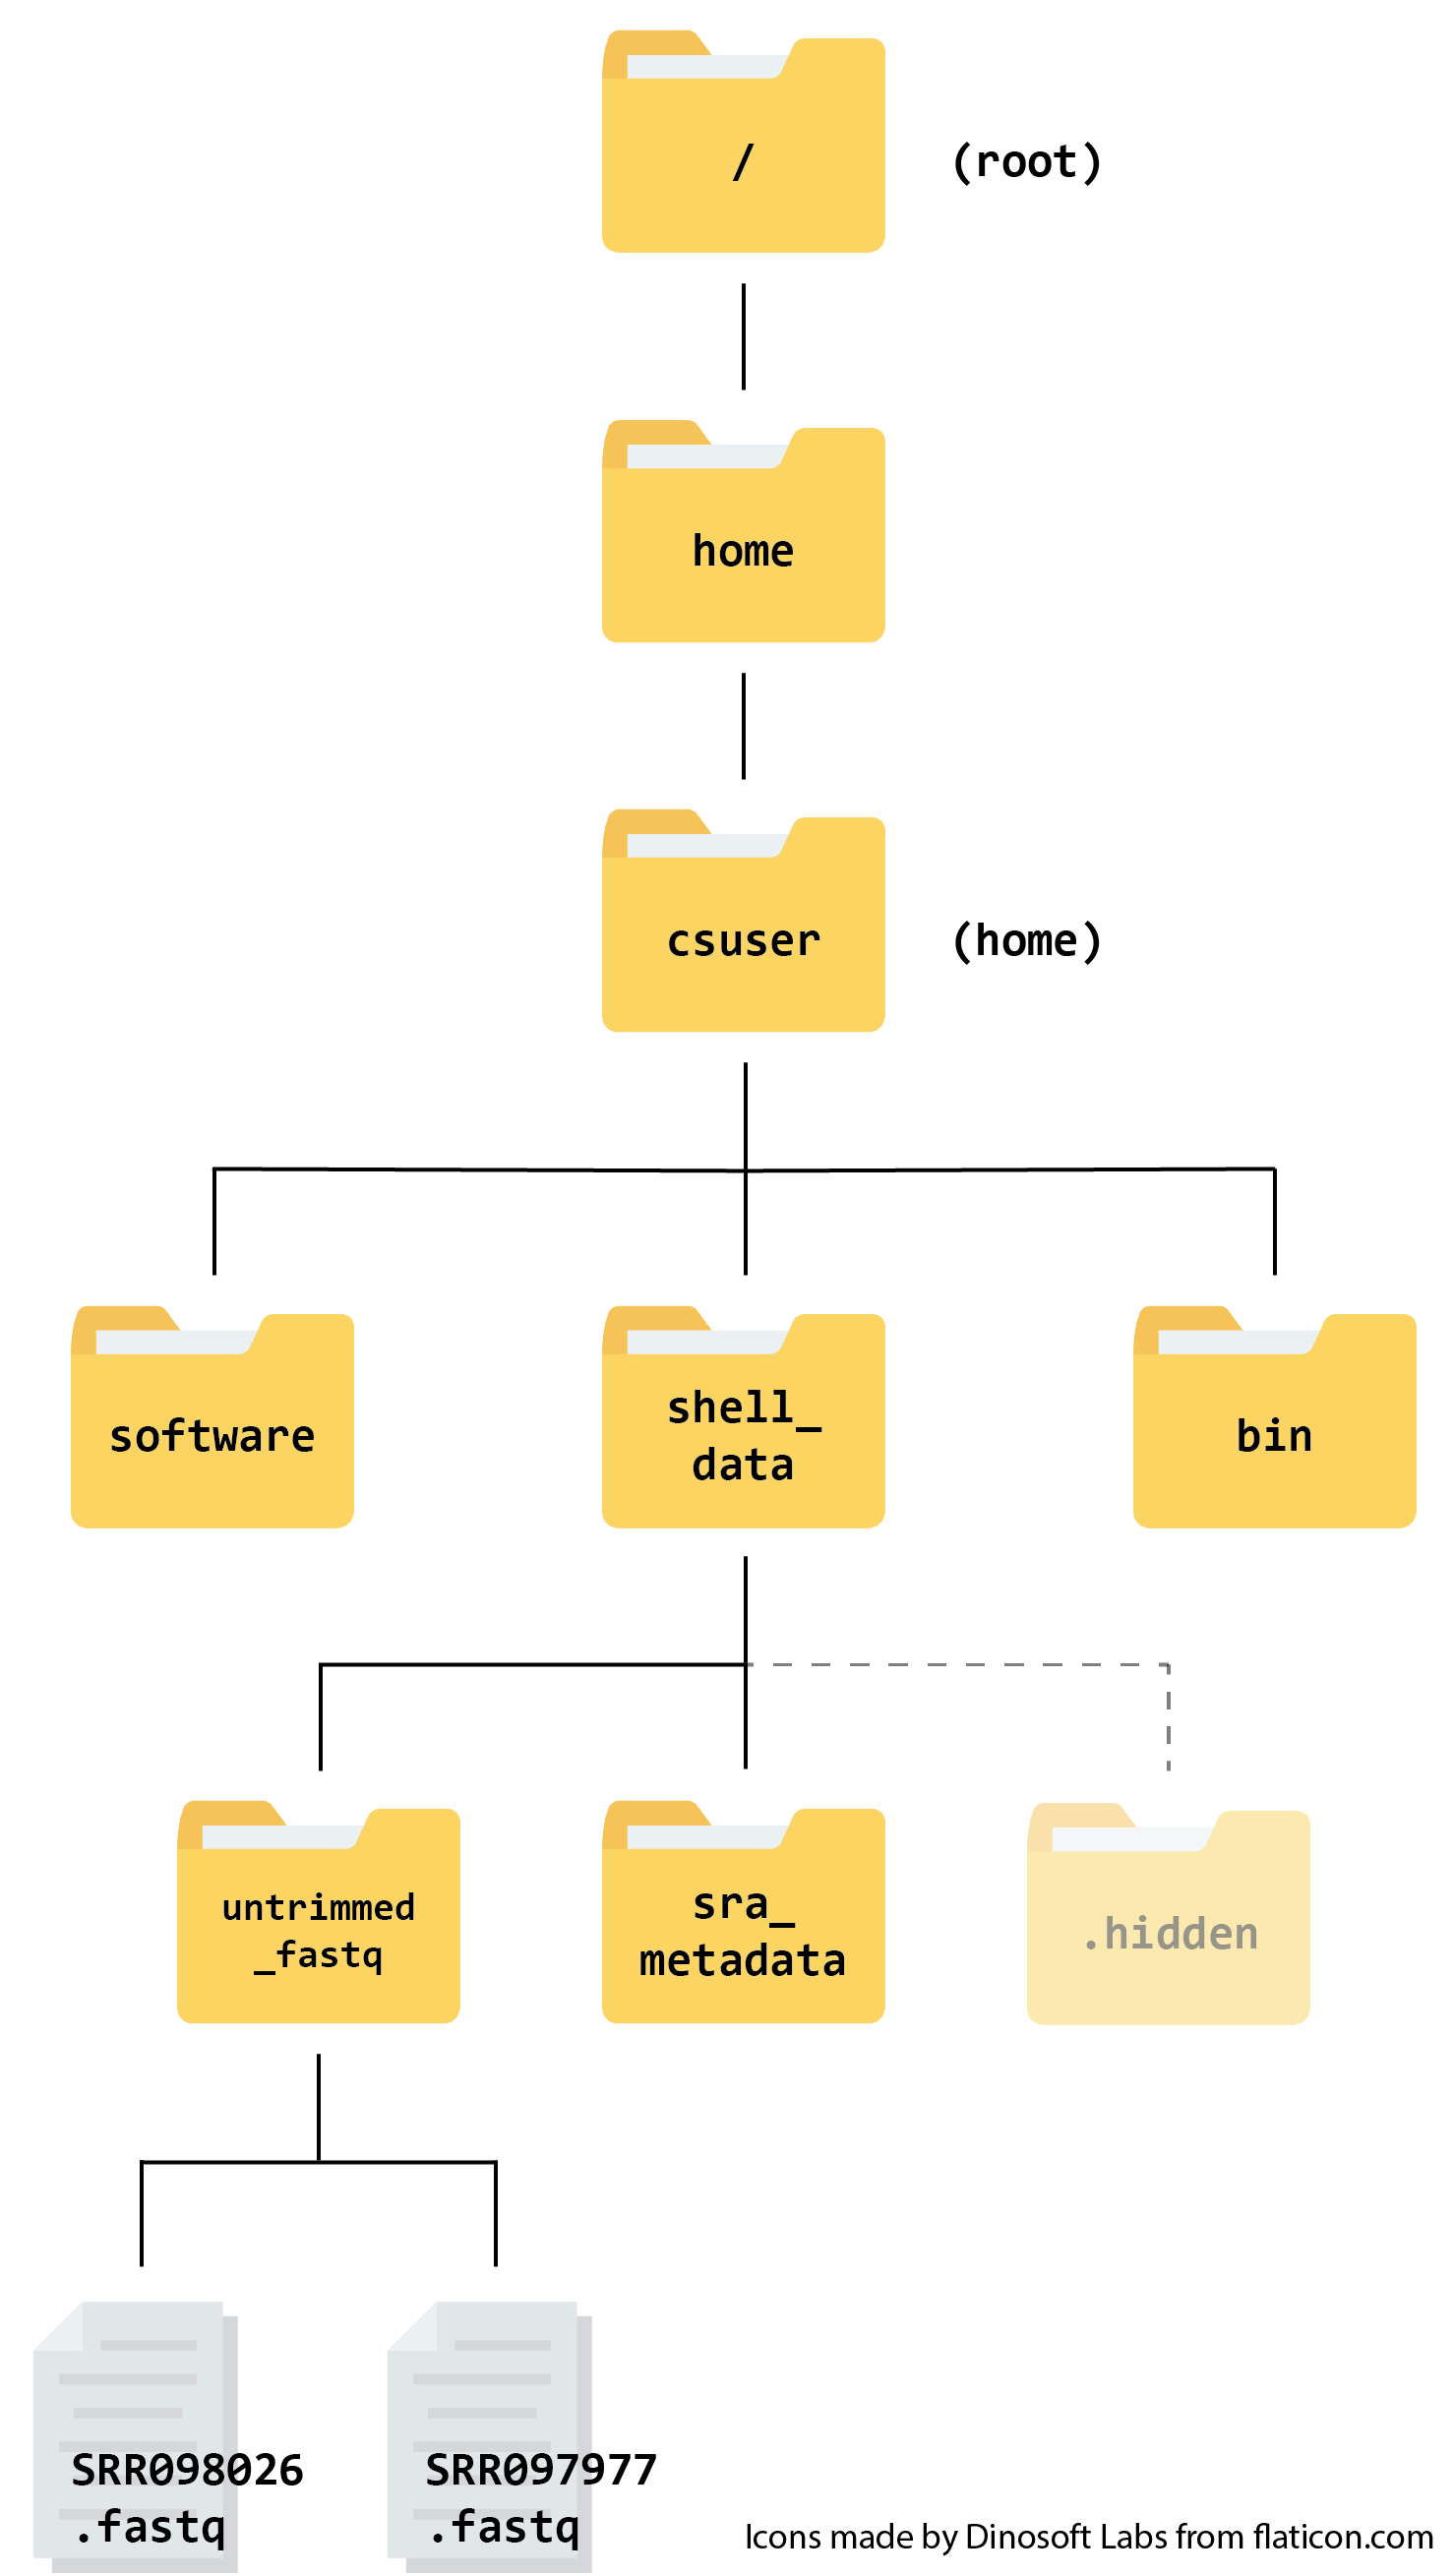
When we log into the instance, we start in the csuser directory (the home directory).
The files we will be using today and in future sessions are the .fastq files found in shell_data/untrimmed_fastq. FASTQ is a format for storing information about sequencing reads and their quality. We will be learning more about FASTQ files in a future lesson on this course.
Writing files
In the Prenomics course we worked a lot with files that already existed, but what if we want to write our own files? We’re not going to type in a FASTA file, but we’ll see as we go through other tutorials, there are a lot of reasons we’ll want to write a file, or edit an existing file.
To add text to files, we’re going to use a text editor called Nano. We’re going to create a file to take notes about the data files in shell_data/untrimmed_fastq.
This is good practice when working in bioinformatics. We can create a file called README.txt that describes the data files in the directory or documents how the files in that directory were generated. As the name suggests, it’s a file that we or others should read to understand the information in that directory.
Let’s change our working directory to shell_data/untrimmed_fastq using cd,
then run nano to create a file called README.txt:
$ cd shell_data/untrimmed_fastq
$ nano README.txt
You should see something like this:
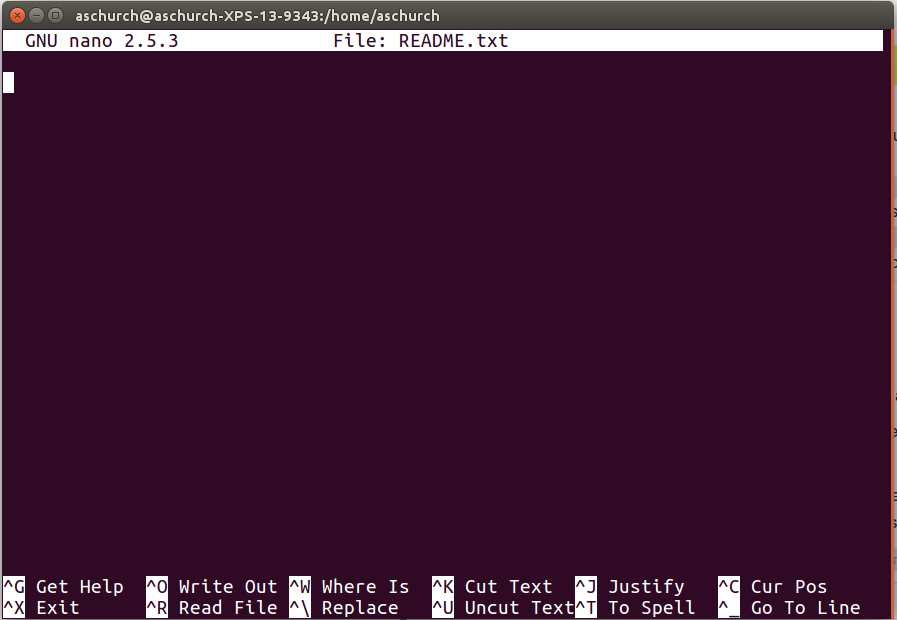
The text at the bottom of the screen shows the keyboard shortcuts for performing various tasks in nano. We will talk more about how to interpret this information soon.
Text editors
Text editors,” like nano, “notepad” on Windows or “TextEdit” on Mac are used to edit any plain text files. Plain text files are those that contain only characters, not images or formatting.
We are using nano because it is one of the least complex Unix text editors. However, many programmers use Emacs or Vim (both of which require more time to learn), or a graphical editor such as Gedit.
No matter what editor you use, you will need to know where it searches for and saves files. If you start it from the shell, it will (probably) use your current working directory as its default location.
Add a couple of lines of text to the README.txt with the date and the types of file we are working with (FASTQ). We can add more to this document later.
Once you’re happy with the text, use Ctrl-O and then Return to accept the suggested default of README.txt.
Now use Ctrl-X to quit the editor and return to the shell.
Control, Ctrl, or ^ Key
The Control key is also called the “Ctrl” key. There are various ways in which using the Control key may be described. For example, you may see an instruction to press the Ctrl key and, while holding it down, press the X key, described as any of:
Control-XControl+XCtrl-XCtrl+X^XC-xIn
nano, along the bottom of the screen you’ll see^G Get Help ^O WriteOut. This means that you can use Ctrl-G to get help and Ctrl-O to save your file.If you are using a Mac, you might be more familiar with the
Commandkey, which is labelled with a ⌘ . But you will often use the theCtrlkey when working in a Terminal.
Now you’ve written a file. You can take a look at it with less or cat, or open it up again and edit it with nano.
Exercise
Open
README.txt, add your name and institution to the top of the file, and save the file.Solution
Use
nano README.txtto open the file. Add your name and institution and then use Ctrl-X followed byyand Enter to save.
FASTQ file format
Before we start playing with our FASTQ files, we should remind ourselves of the FASTQ file format. We will learn about this in more detail in a future lesson on this course. If you took the Prenomics course you should recall learning about this format previously.
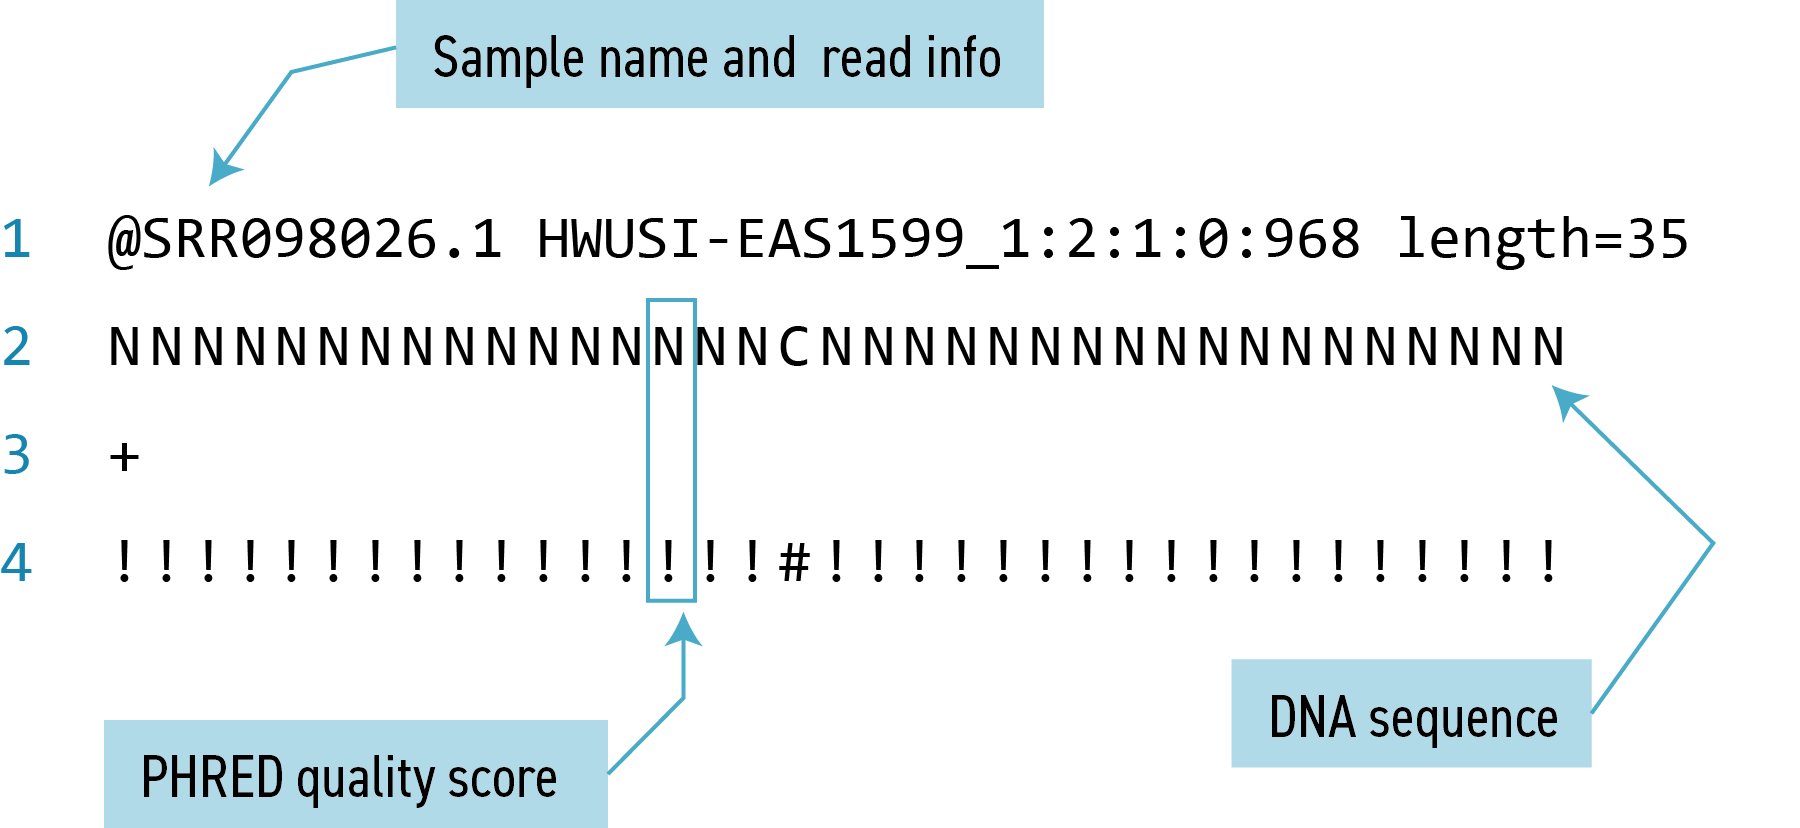
In the FASTQ file format, each ‘read’ (i.e. sequence) is described in four lines of information.
- The first line always starts with an
@followed by the sequence identifier (also called the header or label) and may contain other information such as the read length. - The second line is the sequence of bases itself
- The third line is a separator line which always starts with a
+and may repeat the information from line 1 - The fourth line is a string of characters representing the quality scores for each base
Writing scripts
A really powerful thing about the command line is that you can write scripts. A script contains a list of commands that you want to run. They are useful because it means you have a record of the commands you want and they can be run repeatedly. Though writing scripts may require an additional time investment initially, they make your work reproducible and efficient.
One thing we might want to do with sequencing results is pull out bad reads and write them to a file to see if we can figure out what’s going on with them. We did this on day two of the Prenomics course using the grep command. Here is a reminder of the different commands we used to do this:
| Command | Use |
|---|---|
grep pattern filename |
Identifies and prints sequences that match a given pattern within a file |
grep -v pattern filename |
Identifies and prints sequences that do not match a given pattern |
grep -B1 -A2 pattern filename |
Identifies and prints sequences that match a given pattern, plus one line before (B1) and two lines after (A2) |
> |
Redirect output of a function to a given file e.g. grep pattern filename > newfile |
>> |
Redirect and append the output of a function to a give file (similar to > but does not overwrite the file contents) |
| |
Pipes the output of one function into another |
wc |
Counts number of words, lines and characters in a file |
We’re going to look for reads with long sequences of N’s like we did before, but now we’re going to write a script, so we can run it each time we get new sequences, rather than type the code in by hand each time.
We’re going to create a new file to put this command in. We’ll call it bad-reads-script.sh. The sh isn’t required, but using that extension tells us that it’s a shell script.
$ nano bad-reads-script.sh
Bad reads have a lot of N’s, so we’re going to look for NNNNNNNNNN with grep. We want the whole FASTQ record, so we’re also going to get the one line above the sequence and the two lines below. We also want to look in all the files that end with .fastq, so we’re going to use the * wildcard.
Add this to your script:
grep -B1 -A2 -h NNNNNNNNNN *.fastq > scripted_bad_reads.txt
This will search through all the files ending .fastq and write the reads containing NNNNNNNNNN to a file, scripted_bad_reads.txt
Custom
grepcontrolWe are using
-hto “Suppress the prefixing of file names on output” according to the documentation shown byman grep.
Save bad-reads-script.sh and exit nano.
Now comes the neat part. We can run this script with:
$ bash bad-reads-script.sh
It will look like nothing happened, but now if you look at scripted_bad_reads.txt, you can see that there are now reads in the file.
Exercise
We want the script to tell us when it’s done.
- Open
bad-reads-script.shand add the lineecho "Script finished!"after thegrepcommand. Savebad-reads-script.shand exit nano.- Run the updated script.
Solution
Use
nano bad-reads-script.shto open the file. Addecho "Script finished!"and then use Ctrl-X followed byyand Enter to save.$ bash bad-reads-script.shScript finished!
File Permissions
View the current permissions on a file using the -l (long) flag for the ls command:
$ ls -l
The first part of the output for the -l flag gives you information about the file’s current permissions. There are ten slots in the
permissions list. The first character in this list is related to file type, not permissions, so we’ll ignore it for now. The next three
characters relate to the permissions that the file owner has, the next three relate to the permissions for group members, and the final
three characters specify what other users outside of your group can do with the file. We’re going to concentrate on the three positions
that deal with your permissions (as the file owner).

Here the three positions that relate to the file owner are rw-. The r means that you have permission to read the file, the w
indicates that you have permission to write to (i.e. make changes to) the file, and the third position is a -, indicating that you
don’t have permission to carry out the ability encoded by that space (this is the space where x or executable ability is stored).
Making the script into a program
We had to type bash because we needed to tell the computer what program to use to run this script. Instead, we can turn this script into its own program. We need to tell it that it’s a program by making it executable. We can do this by changing the file permissions. We are going to use the bad-read-scripts.sh file we generated earlier in the episode.
Look at the current permissions for bad-read-scripts.sh .
$ ls -l bad-reads-script.sh
-rw-rw-r-- 1 csuser 0 Oct 25 21:46 bad-reads-script.sh
We see that it says -rw-r--r--. This shows that the file can be read by any user and written to by the file owner (you). We want to change these permissions so that the file can be executed as a program. We use the command chmod. Here we are adding (+) executable permissions (x).
$ chmod +x bad-reads-script.sh
Now let’s look at the permissions again.
$ ls -l bad-reads-script.sh
-rwxrwxr-x 1 csuser csuser 0 Oct 25 21:46 bad-reads-script.sh
Now we see that it says -rwxr-xr-x. The x’s that are there now tell us we can run it as a program. So, let’s try it! We’ll need to put ./ at the beginning so the computer knows to look here in this directory for the program.
$ ./bad-reads-script.sh
The script should run the same way as before, but now we’ve created our very own computer program!
Moving and Downloading Data
So far, we’ve worked with data that is pre-loaded on the instance in the cloud. Usually, however, most analyses begin with moving data onto the instance. Below we’ll show you some commands to download data onto your instance, or to move data between your computer and the cloud.
Getting data from the web to your instance
There are two programs that will download data from a remote server to your local
(or remote) machine: wget and curl. They were designed to do slightly different
tasks by default, so you’ll need to give the programs somewhat different options to get
the same behaviour, but they are mostly interchangeable.
-
wgetis short for “world wide web get”, and it’s basic function is to download web pages or data at a web address. -
cURLis a pun, it is supposed to be read as “see URL”, so its basic function is to display webpages or data at a web address.
We are going to use curl to download some data from Ensembl. So this doesn’t take too long, the file we’re going to download is a very small
tab-delimited file that just tells us what data is available on the Ensembl bacteria server.
$ cd
$ curl -O ftp://ftp.ensemblgenomes.org/pub/release-37/bacteria/species_EnsemblBacteria.txt
The -O flag tells curl to save the file, using the same name, rather than just showing it to us.
It’s important to note that curl downloads to the computer that the
command line belongs to. So, if you are logged into AWS on the command line and execute
the curl command above in the AWS terminal, the file will be downloaded to your AWS
machine, not your local one.
Moving files between your laptop and your instance
What if the data you need is on your local computer, but you need to get it into the cloud? There are also several ways to do this, but it’s always easier to start the transfer locally. This means if you’re typing into a terminal, the terminal should not be logged into your instance, it should be showing your local computer. If you’re using a transfer program, it needs to be installed on your local machine, not your instance.
Transferring Data Between your Local Machine and the Cloud
Using scp for file transfer
scp stands for ‘secure copy protocol’, and is a widely used UNIX tool for moving files
between computers. This is run in your local terminal.
The scp command takes this form:
scp <file I want to move> <where I want to move it>
Note that you always run scp locally, but you can still move files in either direction.
To move a file from your local computer to your AWS instance, the command would look like this:
$ scp <local file> <AWS instance>
To move a file from your AWS instance to your local computer, you re-order the to and from fields:
$ scp <AWS instance> <local file>
You also need to tell scp that you are authorised to have access to your AWS instance. This is done using the same login-key-instanceNNN.pem login key you use to log into the instance.
You tell scp to look for your login key using the flag -i.
What is your AWS instance called?
The address you should use for your AWS instance has two main parts: your login credentials and your file path.
- the first part has the format
csuser@instanceNNN.cloud-span.aws.york.ac.ukwhereNNNis replaced by your instance’s unique number.- the second part is the file path where you want to send/download your file, for example
/home/csuser/.- the two parts are separated by a colon with no spaces.
Uploading Data to your Virtual Machine with scp
Make a text file called test.txt in your cloudspan folder on your local machine. It doesn’t matter what is in it - we just want a file to work with.
Launch another Git Bash or Terminal from the cloudspan folder. You will now have two terminals, one logged on to your instance and one, the local terminal not.
Now use scp to upload test.txt to the csuser home directory (make sure you substitute instanceNNN with your instance’s number). Type the following into the local terminal:
$ scp -i login-key-instanceNNN.pem test.txt csuser@instanceNNN.cloud-span.aws.york.ac.uk:/home/csuser/
If you were using instance001 and copying the file test.txt the command would look like this.
$ scp -i login-key-instance001.pem test.txt csuser@instance001.cloud-span.aws.york.ac.uk:/home/csuser/
Note this assumes that test.txt and the login key file are in your working directory - i.e., the directory you launched Git Bash or Terminal from. You can check your working directory with pwd.
Tip: If test.txt or your login key file, or both, are not in your working directory then you will need to give the relative paths to them.
Downloading from your AWS instance with scp
We will transfer the file containing the bad reads from your AWS instance to your local machine. That file is in shell_data/untrimmed_fastq/scripted_bad_reads.txt on your instance.
Now use scp to transfer shell_data/untrimmed_fastq/scripted_bad_reads.txt to the cloudspan directory (make sure you substitute instanceNNN with your instance’s number). Type the following into the local terminal:
$ scp -i login-key-instanceNNN.pem csuser@instanceNNN.cloud-span.aws.york.ac.uk:/home/csuser/shell_data/untrimmed_fastq/scripted_bad_reads.txt .
Note Don’t miss out the . at the end! We wanted to download the file to our cloudspan directory and the cloudspan directory is our working directory therefore we use . meaning “to this directory”
Key Points
Scripts are a collection of commands executed together.
Transferring information to and from virtual and local computers.