Functional annotation
Overview
Teaching: 40 min
Exercises: 10 minQuestions
How can we add functional annotation to our bins?
How can we identify what pathways these are involved with?
Objectives
Define what funtional annotation is
Know how to use prokka for functional annotation
What is functional annotation?
Now we have our binned MAGs, we can start to think about what functions genes contained within their genomes do. We can do this via functional annotation - a way to collect information about and describe a DNA sequence.
Unlike taxonomic annotation, which tells us which organisms are present in the metagenome assembly, functional annotation tells us the potential metabolic capacity of the organism we are annotating. This is possible because there is software avaiable which uses features in DNA sequences to predict where genes start and end, allowing us to predict which genes are in our MAGs.
A high quality functional annotation is important because it is very useful for lots of downstream analyses. For instance, if we were looking for genes that have a particular function, we would only be able to do that if we were able to predict the location of the genes in these assemblies.
Predicted gene sequences can also be used to generate metabolic pathway information using the KEGG database. We will cover how to do this using a tool called BlastKOALA.
We could additionally use these predicted genes to identify domains associated with well-characterised proteinsor structures using tools such as InterProScan. Predicting genes allows us to identify regions of the MAG that aren’t coding regions and may be involved in gene regulation. We will not be covering these topics in this lesson but we will briefly discuss InterProScan in the final episode of this lesson.
As with taxonomic annotation, effectiveness is determined by the database that the MAG sequence is being compared to. If you do not use the appropriate database you may not end up with many annotated sequences. In particular, Prokka (the tool we will use in this episode) annotates archaea and bacterial genomes. If you are trying to annotate a fungal genome or a eukaryote, you will need to use something different.
How do we perform functional annotation?
We will be annotating each of our MAGs using Prokka for rapid prokaryotic genome annotation on the command line.
Software choices
We are using Prokka here as it is still the software most commonly used. However, the program is no longer being updated. One recent alternative that is being actively developed is Bakta.
Prokka identifies candidate genes in a iterative process. First it uses Prodigal (another command line tool) to find candidate genes.These are then compared against databases of known protein sequences in order to determine their function. If you like, you can read more about Prokka in this 2014 paper.
Prokka has been pre-installed on our instance. First, let’s create a directory inside analysis where we can store our outputs from Prokka.
cd ~/cs_course/analysis/
mkdir prokka
cd prokka
Initially we will annotate just one MAG at a time with Prokka.In the previous episode we produced 6 MAGs of varying quality. In this example, we will start with the MAG bin.6.fa, as this MAG had the highest completeness (99.45%) and lowest contamination (0%). However first we will need to use a conda environment we have prepared in order to run the software.
Activating an environment
Environments are a way of installing a piece of software so that is isolated so that things installed within it do not effect the other software installed at a system wide level. For some pieces of software, the requirements for different dependency versions, such different versions of python mean this is an easy way to have multiple pieces of software installed without conflicts. One popular way to manage environments is to use conda which is a popular environment manager. We will not discuss using conda in detail, so for further information of how to use it, here is a carpentries course that covers how to use conda in more detail. For this course we have created a conda environment containing prokka, in order to use this we will need to use the conda activate command
conda activate prokka
You will be able to tell you have activated your envrionment because your prompt should go from looking like this, with base at the beginning:
(base) csuser@instance001:~ $
To having prokka at the beginning. If you forget whether you are in an the prokka environment, look back to see what the prompt looks like.
(prokka) csuser@instance001:~ $
Now let’s take a look at the help page for Prokka using the -h flag.
prokka -h
Looking at the help page tells us how to construct our basic command, which looks like this:
prokka --outdir mydir --prefix mygenome contigs.fa
-
mydiris the directory where Prokka should store its output --outdir mydirtells Prokka that the ‘output directory’ ismydir--prefix mygenometells Prokka that the output files should all be labelledmygenomecontigs.fais the file we want Prokka to annotate
Prokka produces multiple different file types, which you can see in the table below. We are mainly interested in .faa and .tsv but many of the other files are useful for submission to different databases.
| Suffix | Description of file contents |
|---|---|
| .fna | FASTA file of original input contigs (nucleotide) |
| .faa | FASTA file of translated coding genes (protein) |
| .ffn | FASTA file of all genomic features (nucleotide) |
| .fsa | Contig sequences for submission (nucleotide) |
| .tbl | Feature table for submission |
| .sqn | Sequin editable file for submission |
| .gbk | Genbank file containing sequences and annotations |
| .gff | GFF v3 file containing sequences and annotations |
| .log | Log file of Prokka processing output |
| .txt | Annotation summary statistics |
| .tsv | Tab-separated file of all features: locus_tag,ftype,len_bp,gene,EC_number,COG,product |
prokka --outdir bin.6 --prefix bin.6 ../binning/pilon.fasta.metabat-bins1500-YYYMMDD_HHMMSS/bin.6.fa
This should take around a minute on the instance so we will not be running the command in the background.
Exercise 1: Recap of Prokka command
Test yourself! What do each of these parts of the command signal?
--outdir bin.6--prefix bin.6../binning/pilon.fasta.metabat-bins1500-YYYMMDD_HHMMSS/bin.6.faSolution
bin.6is the name of the directory where Prokka will place its output filesbin.6will be the name of each output file e.g.bin.6.tsvorbin.6.faa- This is the file path for the file we want Prokka to annotate
When you initially run the command you should see similar to the following.
[15:45:37] This is prokka 1.14.6
[15:45:37] Written by Torsten Seemann <torsten.seemann@gmail.com>
[15:45:37] Homepage is https://github.com/tseemann/prokka
[15:45:37] Local time is Thu Oct 13 15:45:37 2022
[15:45:37] You are csuser
[15:45:37] Operating system is linux
[15:45:37] You have BioPerl 1.7.8
Argument "1.7.8" isn't numeric in numeric lt (<) at /home/csuser/.miniconda3/envs/prokka/bin/prokka line 259.
[15:45:37] System has 8 cores.
[15:45:37] Will use maximum of 8 cores.
[15:45:37] Annotating as >>> Bacteria <<<
[15:45:37] Generating locus_tag from 'bin.6.fa' contents.
And you should see the following when the command has finished:
[15:45:59] Output files:
[15:45:59] bin.6/bin.6.txt
[15:45:59] bin.6/bin.6.log
[15:45:59] bin.6/bin.6.tsv
[15:45:59] bin.6/bin.6.fsa
[15:45:59] bin.6/bin.6.fna
[15:45:59] bin.6/bin.6.sqn
[15:45:59] bin.6/bin.6.faa
[15:45:59] bin.6/bin.6.gbk
[15:45:59] bin.6/bin.6.ffn
[15:45:59] bin.6/bin.6.err
[15:45:59] bin.6/bin.6.tbl
[15:45:59] bin.6/bin.6.gff
[15:45:59] Annotation finished successfully.
[15:45:59] Walltime used: 0.37 minutes
[15:45:59] If you use this result please cite the Prokka paper:
[15:45:59] Seemann T (2014) Prokka: rapid prokaryotic genome annotation. Bioinformatics. 30(14):2068-9.
[15:45:59] Type 'prokka --citation' for more details.
[15:45:59] Thank you, come again.
Now prokka has finished running, we can exit the conda environment and our prompt should return to base. In order to do this we need to use the conda deactivate command, which is as follows:
conda deactivate
Your prompt should return from something like this:
(prokka) csuser@metagenomicsT3instance04:~ $ conda deactivate
to this:
(base) csuser@metagenomicsT3instance04:~ $
If we navigate into the bin.6 output file we can use ls to see that Prokka has generated many files.
cd bin.6
ls
bin.6.err bin.6.faa bin.6.ffn bin.6.fna bin.6.fsa bin.6.gbk bin.6.gff bin.6.log bin.6.sqn bin.6.tbl bin.6.tsv bin.6.txt
As mentioned previously, the two files we are most interested in are those with the extension .tsv and .faa:
- the
.tsvfile contains information about every gene identified by Prokka, including its length and name - the
.faafile is a FASTA file containing the amino acid sequence of every gene that has been identified.
We can take a look at the .tsv file using head.
head bin.6.tsv
locus_tag	ftype	length_bp	gene	EC_number	COG	product
JODGFBLK_00001	CDS	768	lysS	6.1.1.6		Lysine--tRNA ligase
JODGFBLK_00002	CDS	1002	dusB	1.3.1.-	COG0042	tRNA-dihydrouridine synthase B
JODGFBLK_00003	CDS	219				hypothetical protein
JODGFBLK_00004	CDS	504	folK	2.7.6.3	COG0801	2-amino-4-hydroxy-6-hydroxymethyldihydropteridine pyrophosphokinase
JODGFBLK_00005	CDS	363	folB	4.1.2.25	COG1539	Dihydroneopterin aldolase
JODGFBLK_00006	CDS	858	folP	2.5.1.15		Dihydropteroate synthase
JODGFBLK_00007	CDS	882	pabC	4.1.3.38	COG0115	Aminodeoxychorismate lyase
JODGFBLK_00008	CDS	585	pabA	2.6.1.85	COG0512	Aminodeoxychorismate/anthranilate synthase component 2
JODGFBLK_00009	CDS	1410	pabB	2.6.1.85	COG0147	Aminodeoxychorismate synthase component 1
Something here about what each column means.
We can then look at the .faa file to see the sequences of these genes.
head bin.6.faa
>JODGFBLK_00001 Lysine--tRNA ligase
MSQEEHNHEELNDQLQVRRDKMNQLRDNGIDPFGARFERTHQSQEVISAYQDLTKEELEE
KAIEVTIAGRMMTKRGKGKAGFAHLQDLEGQIQIYVRKDSVGDDQYEIFKSSDLGDLIGV
TGKVFKTNVGELSVKATSFELLTKALRPLPDKYHGLKDVEQRYRQRYLDLIVNPDSKHTF
IARSKIIQAMRRYLDDHGYLEVETPTMHSIPGGASARPFITHHNALDIPLYMRIAIELHL
KRLIVGGLEKYMNNT
>JODGFBLK_00002 tRNA-dihydrouridine synthase B
MFKIGDIQLKNRVVLAPMAGVCNSAFRLTVKEFGAGLVCAEMVSDKAILYNNARTMGMLY
IDEREKPLSLQIFGGKKETLVEAAKFVDQNTTADIIDINMGCPVPKITKCDAGAKWLLDP
DKIYEMVSAVVDAVDKPVTVKMRMGWDEDHIFAVENAKAVERAGGKAVALHGRTRVQMYE
GTANWDIIKDVKQSVSIPVIGNGDVKTPQDAKRMLDETGVDGVMIGRAALGNPWMIYRTV
QYLETGELKEEPQVREKMAVCKLHLDRLINLKGENVAVREMRKHAAWYLKGVRGNANVRN
EINHCETREEFVQLLDAFTVEVEAKELQNAKVG
>JODGFBLK_00003 hypothetical protein
MEAEIWGRRIRAFRKLKGYTQEGFAKALGISVSILGEIERGNRLPSAAIIQGAADVLNIS
ADELAPPEKDNE
Relating these genes to an online database
Introduction to KEGG
Start by downloading the bin.6.faa file to your local machine using scp.
scp -i login-key-instanceNNN.pem csuser@instanceNNN.cloud-span.aws.york.ac.uk:~/cs_course/analysis/prokka/bin.6/bin.6.faa
You can then upload this file onto BlastKOALA. BlastKOALA is a tool which can annotate the sequences with K numbers. These then relate back to the KEGG database.
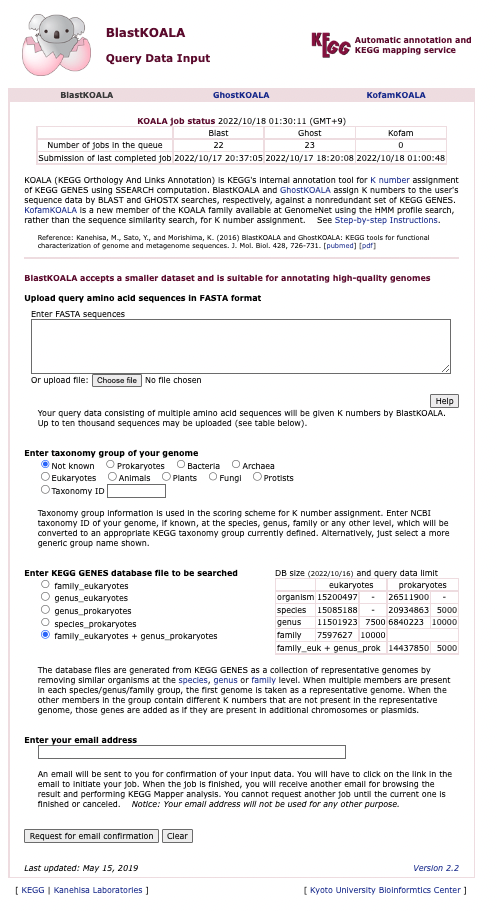
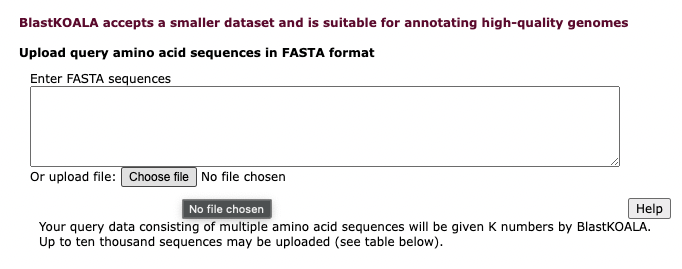
You should click on the “Choose file” button and navigate to where your *.faa file is located on your computer.
We will leave all the options on default, but you need to add in your email address so BlastKOALA can email you to start the job.
Once you have pressed submit you should be re-directed to a screen that says “Request accepted”. You will also be sent an email with two links, one to submit the job and one to cancel. Make sure you press the submit link as your job will not be running without it! If you haven’t received an email, check your spam.
Once you have pressed the submit link in the email you should be redirected to a BlastKOALA page that says “Job submitted”. This is an online server shared by lots of people, so your job has to queue with other jobs before it can be executed. This may take a while. You will recieve an email when the job has completed.
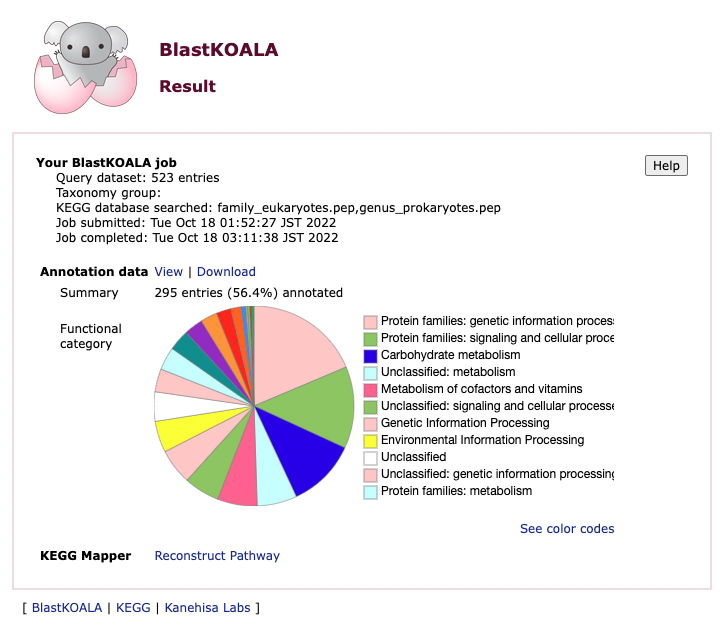
Once the job has been completed you will receive a link by email. From this you can explore the annotated MAG. You can view/download the data and use the KEGG mapper reconstruct pathway option to see how these genes interact with each other.
Building a tree from the 16S sequence
Prokka is able to identify 16S sequences present in our MAGs. This can be used to build a quick taxonomic tree to see what organisms our MAG is related to.
First we will search for the presence of 16S sequences in the Prokka output.
While still logged into the instance, navigate to the Prokka output directory you generated earlier (~/cs_course/analysis/prokka/bin.6). Once in that directory we can search for sequenced identified as being 16S in the .tsv file using grep:
grep 16S *.tsv
You should get a result similar to the below. Yours may differ slightly depending on the MAG you ran.
JODGFBLK_00079	rRNA	1547				16S ribosomal RNA
JODGFBLK_00089	rRNA	1553				16S ribosomal RNA
JODGFBLK_00259	rRNA	1547				16S ribosomal RNA
JODGFBLK_00414	rRNA	583				16S ribosomal RNA (partial)
JODGFBLK_00417	rRNA	1546				16S ribosomal RNA
Note:
If you don’t get an output here it may be that your MAG doesn’t have any 16S sequences present. In the case of this lesson, that means you have run Prokka on a less complete MAG than the one we used. You should double check your output from CheckM and pick a MAG that is highly complete to run through Prokka instead.
Our output shows that there are 4 full size 16S ribosomal RNA genes present in our data, and one partial one.
The next step is to pull out the sequence of one of these 16S rRNA genes and run it through a BLAST database. This is possible using the .ffn file which gives the sequences in nucleotide format. We’ll need to search the .ffn file for the tag associated with our gene of interest (the first column in the output above).
We do this using seqkit with a grep option, which you can read more about here). Here’s the format of this command:
seqkit grep -p <prokka_id> <prokka.ffn>
So in our case this command would be:
$ seqkit grep -p JODGFBLK_00079 bin.6.ffn
You can see the output of our command below:
16S sequence
>JODGFBLK_00079 16S ribosomal RNA
TCGGAGAGTTTGATCCTGGCTCAGGACGAACGCTGGCGGCGTGCCTAATACATGCAAGTC
GAGCGGACAGATGGGAGCTTGCTCCCTGATGTTAGCGGCGGACGGGTGAGTAACACGTGG
GTAACCTGCCTGTAAGACTGGGATAACTCCGGGAAACCGGGGCTAATACCGGATGCTTGT
TTGAACCGCATGGTTCAAACATAAAAGGTGGCTTCGGCTACCACTTACAGATGGACCCGC
GGCGCATTAGCTAGTTGGTGAGGTAATGGCTCACCAAGGCAACGATGCGTAGCCGACCTG
AGAGGGTGATCGGCCACACTGGGACTGAGACACGGCCCAGACTCCTACGGGAGGCAGCAG
TAGGGAATATTCCGCAATGGACGAAAGTCTGACGGAGCAACGCCGCGTGAGTGATGAAGG
TTTTCGGATCGTAAAGCTCTGTTGTTAGGGAAGAACAAGTACCGTTCGAATAGGGCGGTA
CCTTGACGGTACCTAACCAGAAAGCCACGGCTAACTACGTGCCAGCAGCCGCGGTAATAC
GTAGGTGGCAAGCGTTGTCCGGAATTATTGGGCGTAAAGGGCTCGCAGGCGGTTCCTTAA
GTCTGATGTGAAAGCCCCCGGCTCAACCGGGGAGGGTCATTGGAAACTGGGGAACTTGAG
TGCAGAAGAGGAGAGTGGAATTCCACGTGTAGCGGTGAAATGCGTAGAGATGTGGAGGAA
CACCAGTGGCGAAGGCGACTCTCTGGTCTGTAACTGACGCTGAGGAGCGAAAGCGTGGGG
AGCGAACAGGATTAGATACCCTGGTAGTCCACGCCGTAAACGATGAGTGCTAAGTGTTAG
GGGTTTCCGCCCCTTAGTGCTGCAGCTAACGCATTAAGCACTCCGCCTGGGGAGTACGGT
CGCAAGACTGAAACTCAAAGGAATTGACGGGGGCCCGCACAAGCGGTGGAGCATGTGGTT
TAATTCGAAGCAACGCGAAGAACCTTACCAGGTCTTGACATCCTCTGACAATCCTAGAGA
TAGGACGTCCCCTTCGGGGGCAGAGTGACAGGTGGTGCATGGTTGTCGTCAGCTCGTGTC
GTGAGATGTTGGGTTAAGTCCCGCAACGAGCGCAACCCTTGATCTTAGTTGCCAGCATTC
AGTTGGGCACTCTAAGGTGACTGCCGGTGACAAACCGGAGGAAGGTGGGGATGACGTCAA
ATCATCATGCCCCTTATGACCTGGGCTACACACGTGCTACAATGGACAGAACAAAGGGCA
GCGAAACCGCGAGGTTAAGCCAATCCCACAAATCTGTTCTCAGTTCGGATCGCAGTCTGC
AACTCGACTGCGTGAAGCTGGAATCGCTAGTAATCGCGGATCAGCATGCCGCGGTGAATA
CGTTCCCGGGCCTTGTACACACCGCCCGTCACACCACGAGAGTTTGTAACACCCGAAGTC
GGTGAGGTAACCTTTTTAGGAGCCAGCCGCCGAAGGTGGGACAGATGATTGGGGTGAAGT
CGTAACAAGGTAGCCGTATCGGAAGGTGCGGCTGGATCACCTCCTTT
Now we have the 16S rRNA sequence we can upload this to BLAST and search the 16S database to see what organisms this MAG relates to.
BLAST
We will be using BLAST (Basic Local Alignment Search Tool) which is an algorithm to find regions of similarity between biological sequences. BLAST is a very popular program in bioinformatics so you may be familiar with the online BLAST server run by NCBI.
We will be using the online server, available at BLAST.
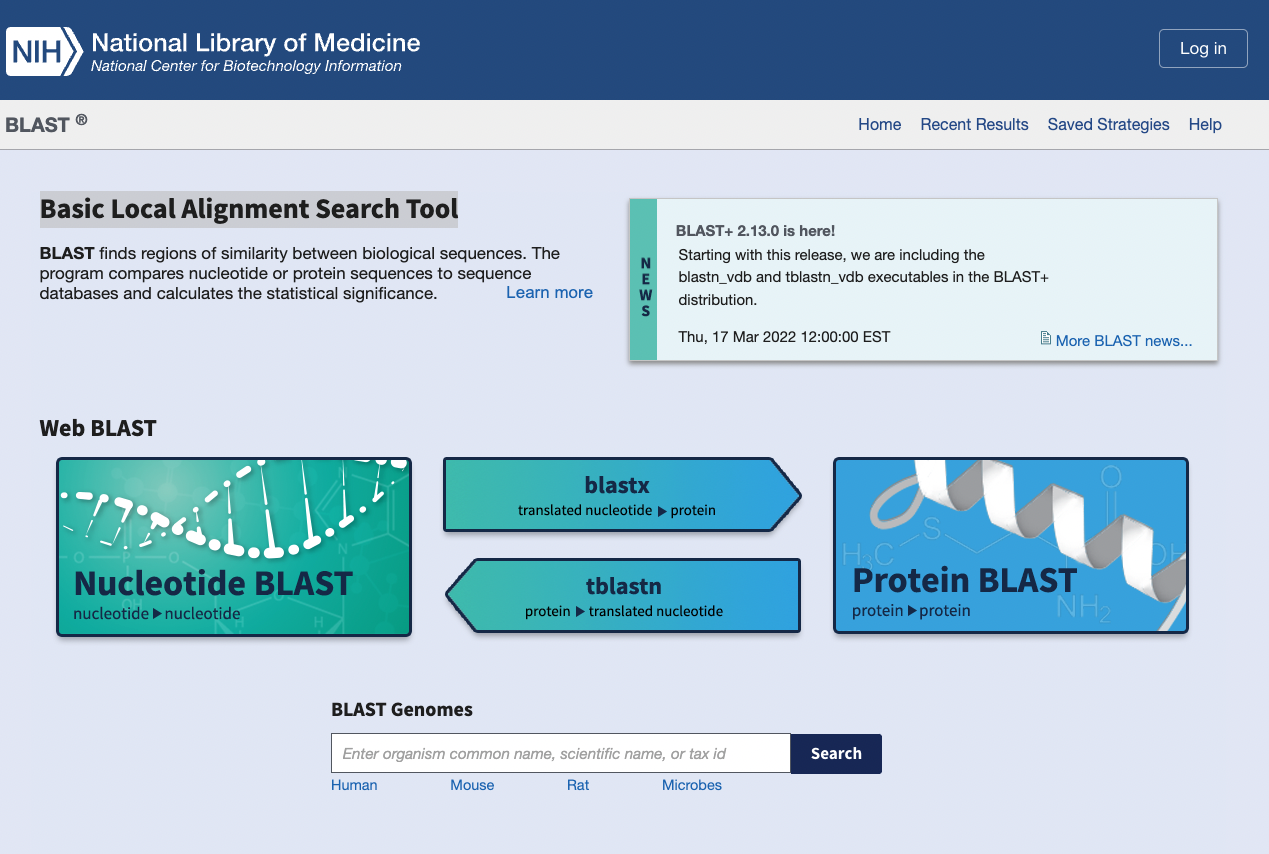
Select the button that says “Nucleotide BLAST”.
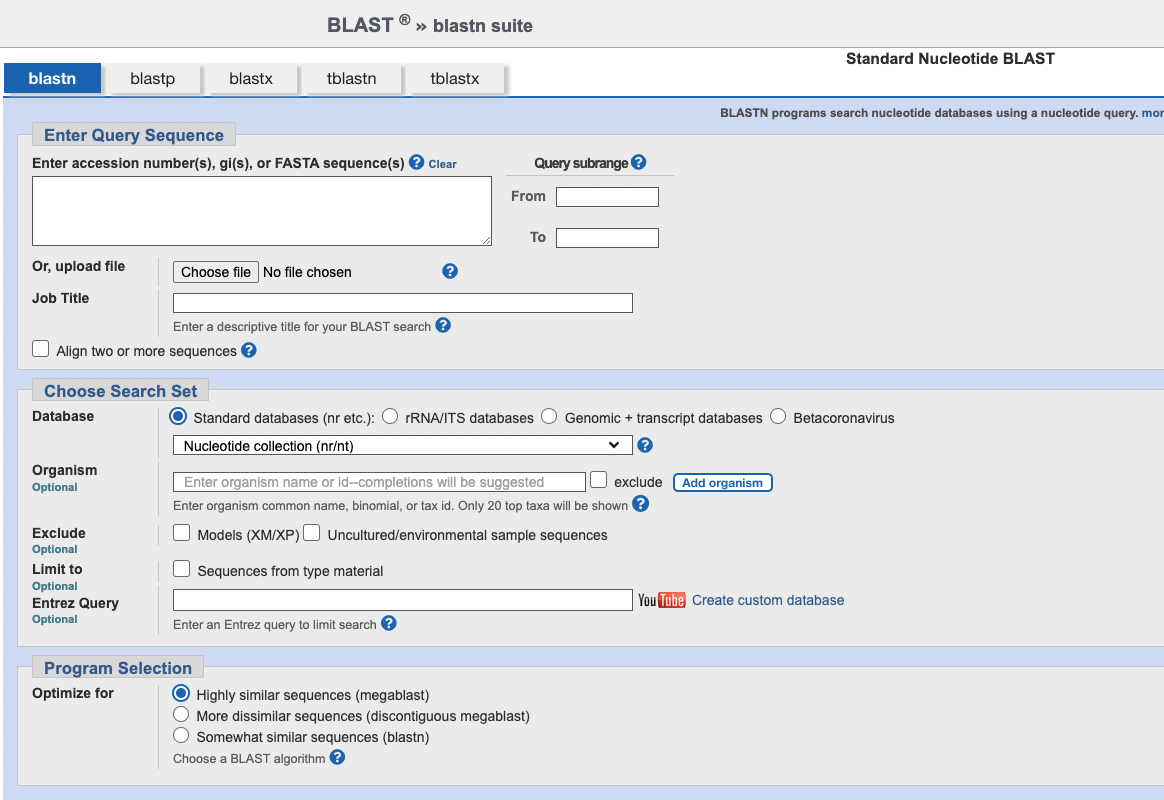
Under “Choose Search Set” set the database to “rRNA/ITS database”. Then, you paste the 16S sequence into the box at the toptitled “Enter accession number(s), gi(s), or FASTA sequence(s)”
Your screen should look something like the below:
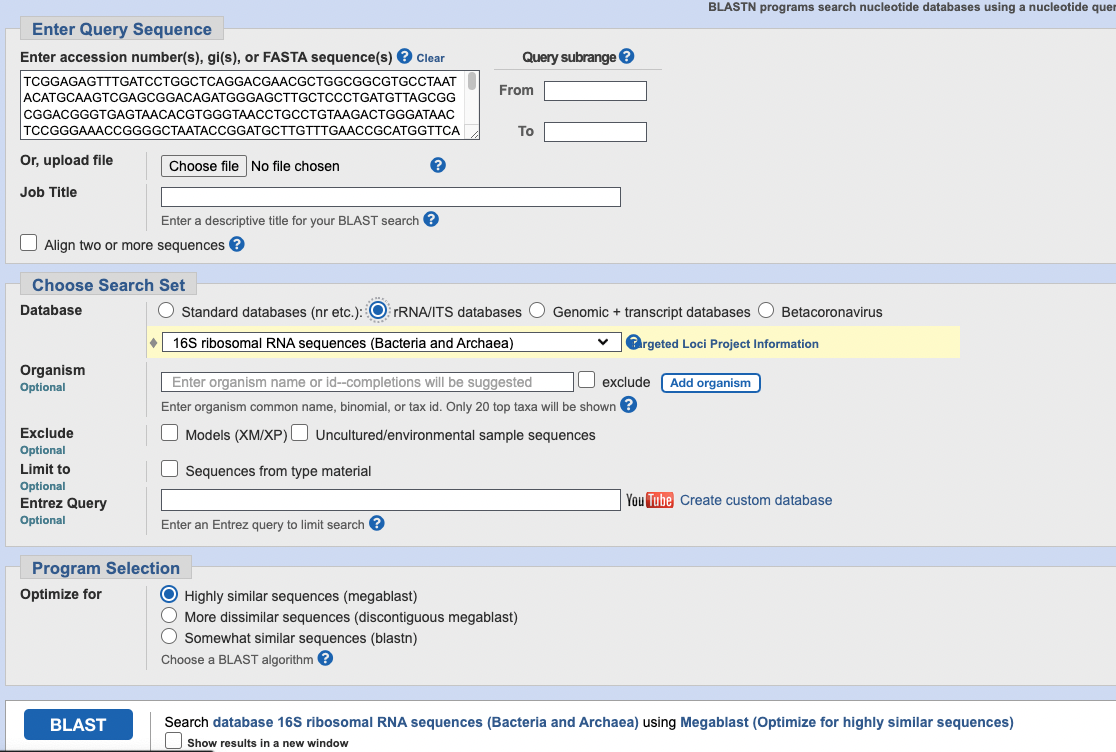
Now, click the blue BLAST button!
Your job will then be added to a queue of other jobs until there is space for it to run. Usually this is only a couple of minutes, especially as the sequence length and database size we are using are small. Make sure you leave the tab open while you wait so you can see your results when they arrive.
Your ouput should look like this:
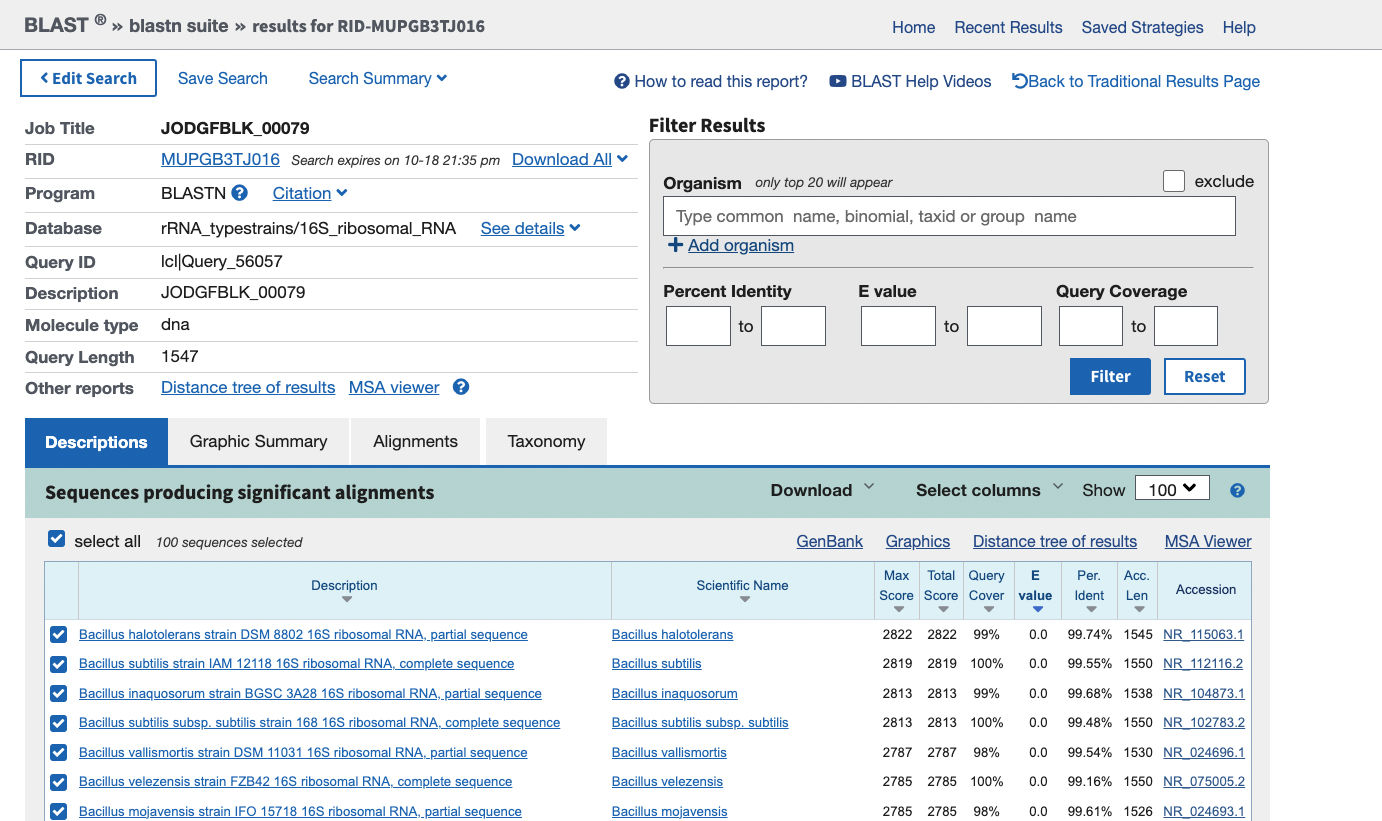
From here you can explore the sequences that were aligned to your 16S sequence using the “Descriptions”, “Graphic Summary”, “Alignments” and “Taxonomy” tabs. You can also browse the “Distance tree of results” to see where your 16S sequence lies in relation to other species.
Exercise 2: Understand the blast output
You will now have a 16S sequence from the MAG that you have chosen. Use the output from your BLAST search to answer these questions.
- What do you think is the most likely annotation for your MAG? ?
- Which columns in the BLAST output do you think are the most important for selecting which is the best hit?
- Now you have identified this MAG, try repeating the process for the other bins and see which organisms they belong to. Which are the best hits for these MAGs?
Solution
- This will vary depending on the MAG you have picked but it will be one of the first hits in the output. The “closest” match will probably be the one with the highest total score. However these are not the only columns worth using to identify the best hit.
- Other columns worth looking at (because the top hit may not be the best) are the query cover, percent identity and the E-value.
- percent identity is how similar the query sequence (your input) is to the target AKA how many characters are identical. Higher percent identity = more similar sequences
- query coverage is the percentage of the query sequence that overlaps the target. If there is only a small overlap then the match is less significant, even if it has a very high percent identity. We want as much of the two sequences to be identical as possible.
- E-value is the number of matches you would expect to see by chance. This is dependent on the size of the database. Lower E-value = less likely to be by chance = a better match.
Key Points
Functional annotation allows us to look at the metabolic capacity of a metagenome
Prokka can be used to predict genes in our assembly
Kofam scan can be used to identify KEGG IDs and enzyme numbers