Configure Your AWS CloudShell Environment
Overview
Teaching: 20 min
Exercises: 10 minQuestions
What is the AWS CloudShell environment?
How to configure the AWS CloudShell environment to run the Scripts?
Objectives
Installing the Scripts.
Prerequisites
Please read Workshops Organisation if you haven’t done so. To complete this episode you will need:
- if you are self-studying the course or attending a workshop using your AWS account:
- to have created and configured your AWS account as described in the two previous episodes: Create Your AWS Account and Configure Your AWS Account.
- the login page, username and password of your IAM user account.
- if you are attending a workshop using a Cloud-SPAN AWS account (and an AWS Linux instance), you don’t need to complete this episode but to follow the instructions in the episode Configure Your Terminal Environment.
Introduction
This episode will guide you to configure the AWS CloudShell so that you can run the Scripts therein to create and manage instances in your AWS account.
The AWS CloudShell is a browser-based [Bash] shell that gives you command-line access to your AWS resources in the selected AWS region.
The AWS CloudShell:
- can only be used while you are logged in to the AWS Console.
- has the AWS CLI installed and configured with programmatic access to your AWS account using temporary security credentials based on the credentials to access the AWS Console — this is completely transparent to the user.
- has other software tools installed including:
Python,Node.js,git,make,pip,curl,zip,unzip,ssh. - runs on a Linux AWS instance whose input and output are directed to the browser tab where it is invoked. The instance has 1 GB storage as a Linux file system.
- preserves data and software that you install in your home directory between sessions, but only for 120 days — you will receive warning emails before they are deleted so you can access the AWS CloudShell again. You can install software at system-wide level but you will have to reinstall it every time you access the AWS CloudShell.
For some applications, the key bindings in the AWS CloudShell may be slightly different to the key bindings for same applications in a desktop/laptop machine.
Outline
Steps
These are the main steps you will follow to configure your AWS CloudShell environment:
Download the Scripts from GitHub.
You will login to the AWS Console with your IAM user account, launch the AWS CloudShell, and download the Scripts from GitHub.Make the Scripts accessible through the execution path.
You will configure the AWS CloudShell so that the Scripts can be run from any location in the AWS CloudShell file system.
1. Download the Scripts from GitHub
Login to the AWS Console
To access the AWS CloudShell environment and download the Scripts therein, you need to be logged in to the AWS Console with your IAM user account.
Open a new browser window and enter the address of the login page for your account IAM users. The address contains the account alias or your 12-digit account number:
- https://youraccountalias.signin.aws.amazon.com/console
- https://123456789012.signin.aws.amazon.com/console
Enter your IAM username and password. You may also get a Security check to complete.
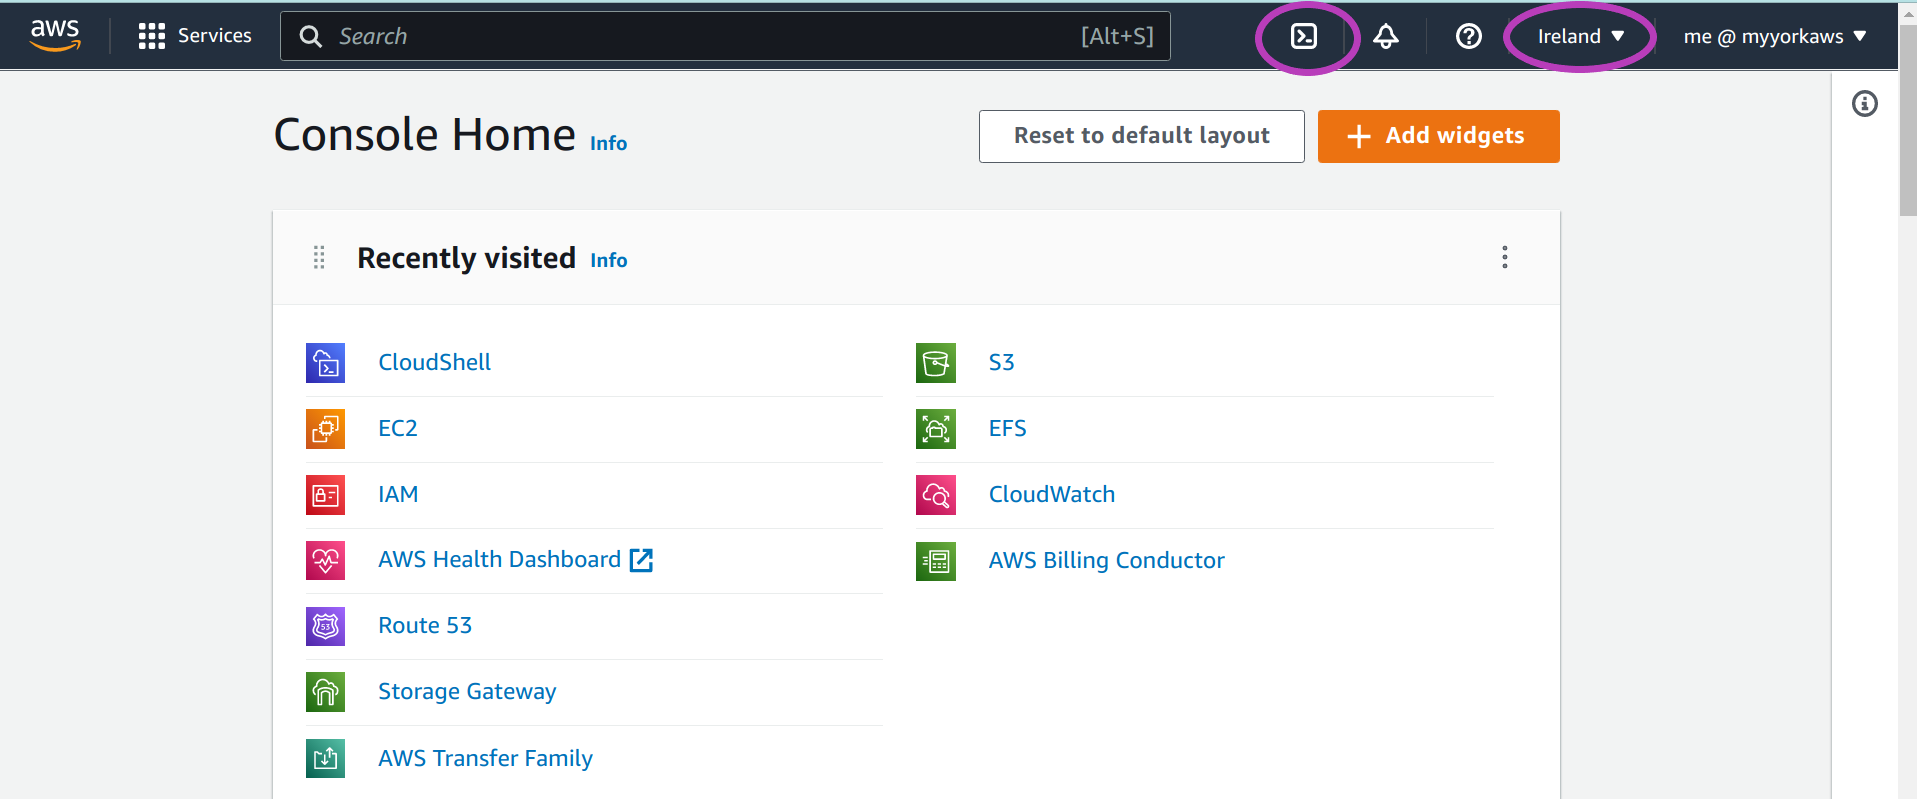
Once you are logged in, a page like the one below will appear.
IMPORTANT: On the top right, check that the region is set to Ireland. Set it to Ireland if it is not:
An AWS CloudShell that you launch can only operate on resources within a selected region. Since the Cloud-SPAN Amazon Machine Image (AMI) from which you will create AWS instances with the Scripts is located in the Ireland region, you need to select this region before launching the AWS CloudShell.
If you are using an institutional account and you cannot set the region to Ireland, set it to the region which your institutional account is enabled to. Hence you will be installing and running the Scripts in the CloudShell for that region. However, before running the Scripts (in the next lesson), you will need to ask your IT department to copy the Cloud-SPAN AMI to your AWS account.
(Note: you can launch multiple AWS CloudShells, each operating on a different region, but this is not needed and hence not covered in the course.)
Launch the AWS CloudShell
To launch the AWS CloudShell, click on its icon at the top: the little square with these two characters “>_” inside.
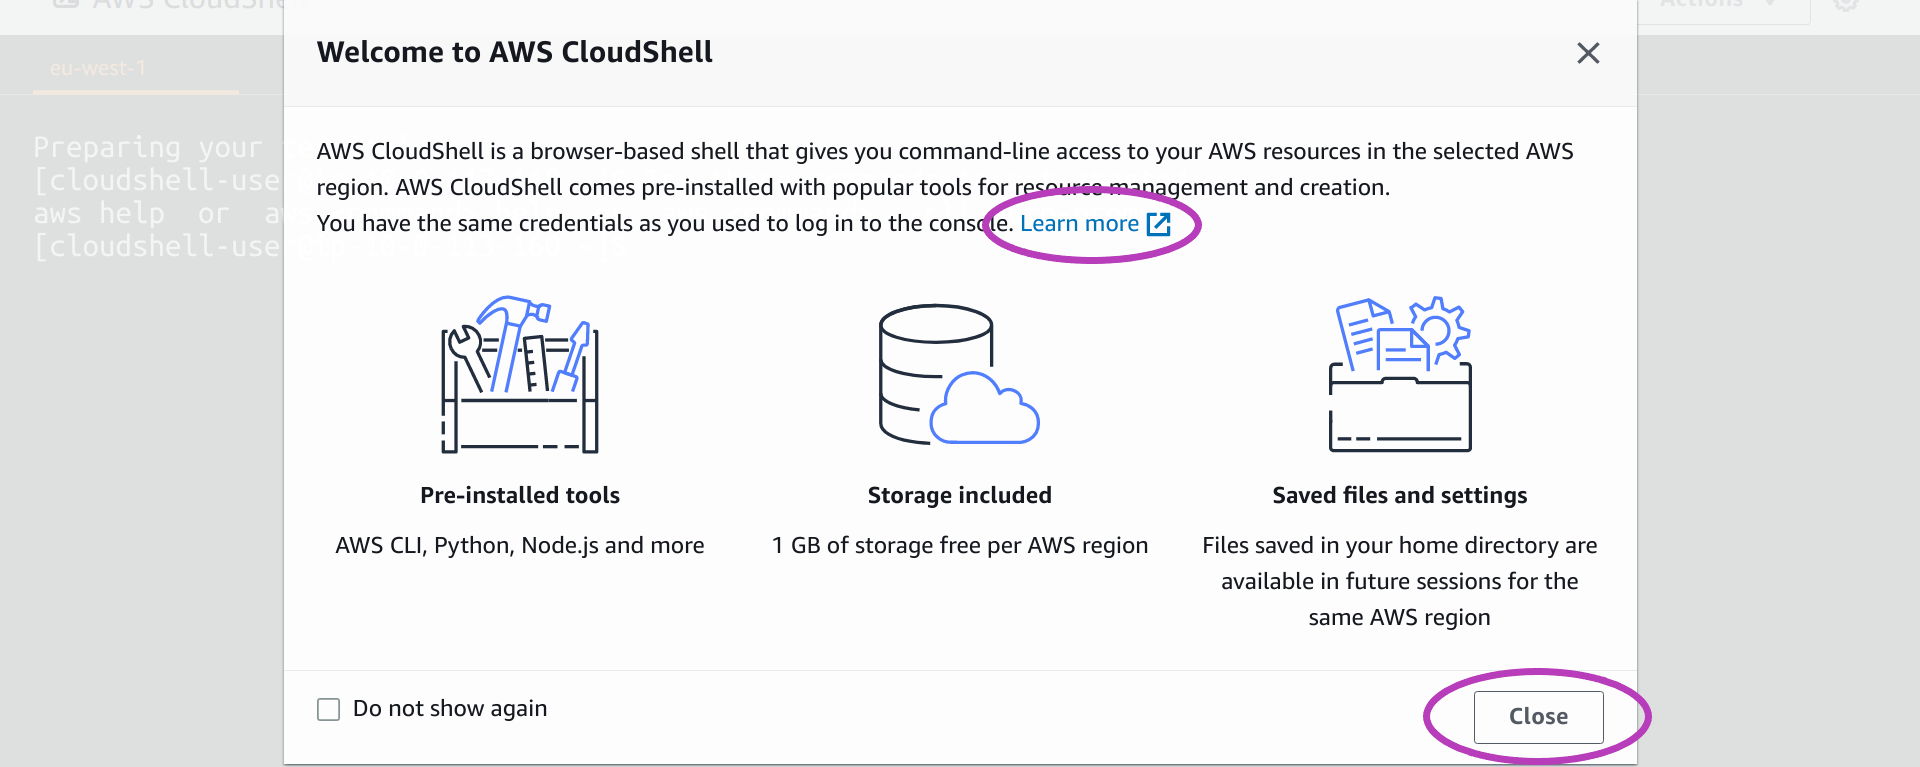
You will be presented with the message “Welcome to AWS CloudShell” below.
If you would like to learn more about the AWS CloudShell (software available, installing software, etc.), click on Learn more. A new browser tab will be opened with the online documentation about the AWS CloudShell.
Click on Close to get to the AWS CloudShell.
You will now be presented with the AWS CloudShell terminal, like the one below.
It may take up to a couple of minutes for the AWS CloudShell terminal to be ready the first time you open it in a Console session:
- first, an AWS instance called the environment will be launched — you will see the message “Waiting for the environment to run …”, not shown below
- then the terminal program will be run — you will see the message “Preparing your terminal …”.
- finally, you will see the terminal prompt, something like this: [cloudshell-user]@ip-11-22-33-44 ~]$ — the numbers in the prompt are the IP address of the instance and may differ every time you open the AWS CloudShell.
The message after the first prompt, “Try these commands to get started: aws help …”, means that the AWS CLI, whose name when used is aws, is ready to be used.

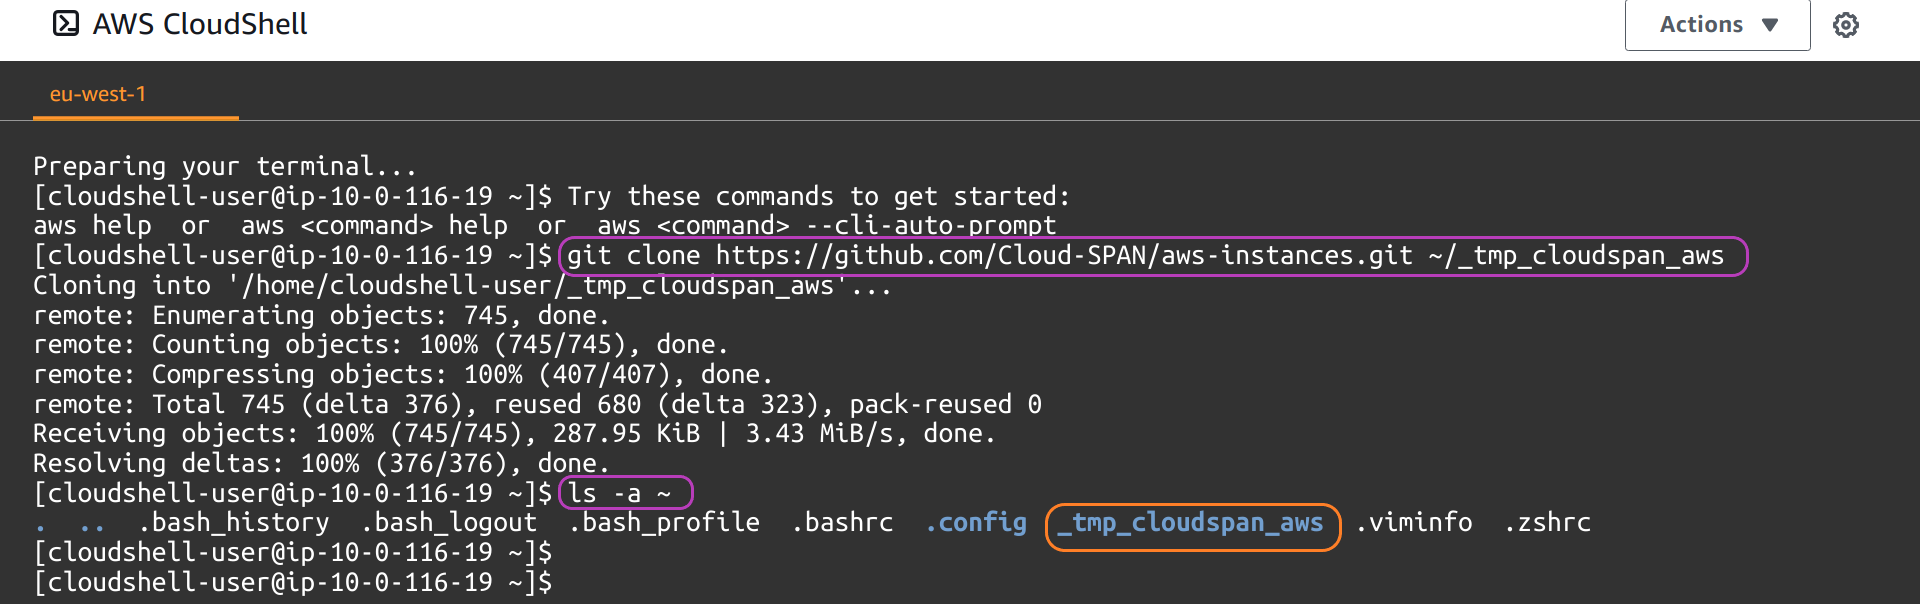
Download the Scripts
To download the Scripts, enter or copy-paste the git command below into the terminal and press Enter.
$ git clone https://github.com/Cloud-SPAN/aws-instances.git ~/_tmp_cloudspan_aws
Now enter the command ls -a ~ to list all the files (visible and hidden) in your home directory which is represented by the ~ character:
$ ls -a ~
The terminal should now look similar to the following. If so, you have downloaded the Scripts into the _tmp_cloudspan_aws directory in your home directory.
2. Make the Scripts accessible through the execution path
There are many ways to make the Scripts accessible through the execution path. To avoid any conflicts with the current configuration of the AWS CloudShell, we are going to:
- create a new “bin” directory
- copy the Scripts to the new bin directory
- add the new bin directory to the execution path
You can copy-paste the commands below to carry out those three steps using ~/.local/bincsaws as the new bin directory, but please note:
If ~/.local/bincsaws already exists in your environment (which you can check with the command ls ~/.local), choose another name for bincsaws and use the new name instead of bincsaws in the three commands below:
$ mkdir -p ~/.local/bincsaws
$ cp ~/_tmp_cloudspan_aws/*.sh  ~/.local/bincsaws
$ echo "PATH=\"\$HOME/.local/bincsaws:\$PATH\"" >> ~/.bashrc
The command echo ... >> ~/.bashrc adds an assignment shell statement at the end of the Bash configuration file ~/.bashrc. The statement adds the new bin directory to the execution path which is held by the shell variable PATH.
Since the terminal program runs the commands in ~/.bashrc every time it is launched, the assigment shell statement will add the “new” bin directory to the execution path on every subsequent launch of the AWS CloudShell.
That means that the Scritps are just not yet accessible through the execution path.
For the Script to become thus accessible, we need either to restart the terminal, or to restart the AWS CloudShell, or to run the source command to make the current terminal run the commands in ~/.bashrc again, and thus get the PATH variable updated within this terminal session.
Let’s use the source command to test the Scripts are accessible through the execution path, and then look at how to restart the terminal and the AWS CloudShell.
Enter or copy-paste the following commands:
$ csinstances_create.sh
$ source ~/.bashrc
$ csinstances_create.sh
The terminal should now look like this:
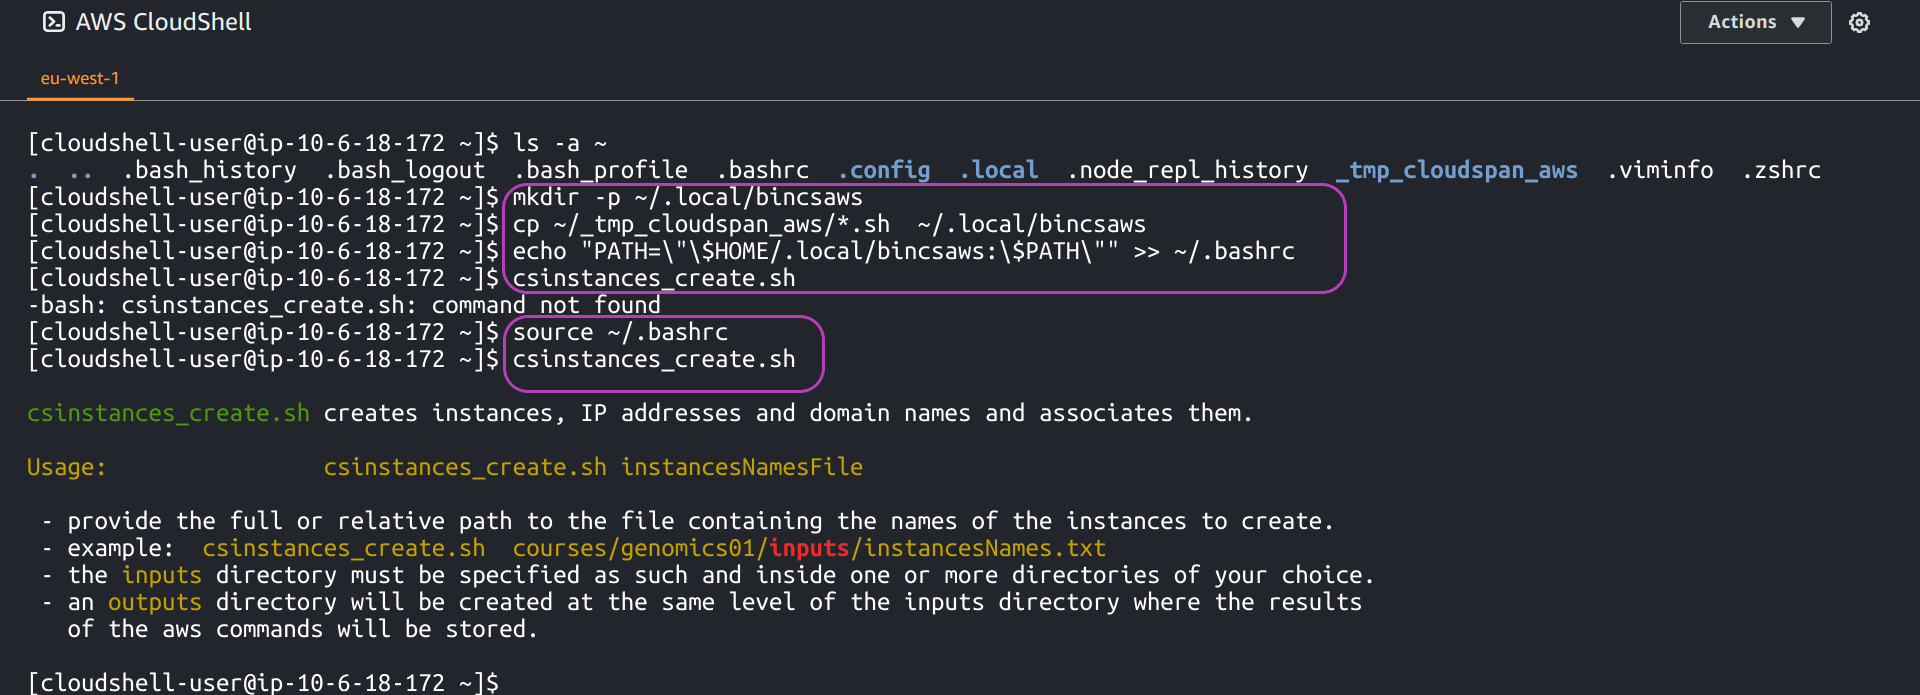
The script csinstances_create.sh is one the Scripts installed in ~/.local/bincsaws. You can see in the screenshot that it was not found by the terminal before source was run to update the execution path, but thereafter it was found and run. As it requires a parameter (the name of a file), csinstances_create.sh only displayed the usage message and finished.
Your AWS CloudShell environment is now configured to use the Scripts in the next lesson: Managing AWS Instances.
Don’t delete the directory ~/_tmp_cloudspan_aws where the Scripts where downloaded
Please don’t delete that directory just yet. We will use some files therein in the next lesson. Once we use those files you will delete that directory.
Restarting the terminal and the AWS CloudShell
You can restart the terminal by simply logging out of the terminal through entering the command exit or typing Ctrl-d (pressing the keys Ctrl and d simultaneously). Once you are logged out, press any key for the terminal to be launched again. Restarting the terminal is lightweight in that it is relatively quick because only the terminal program is restarted.
You can restart the AWS CloudShell by closing the browser tab and launching CloudShell again, or by clicking on the Actions drop-down menu on the top right of the screen and then clicking on Restart AWS CloudShell.
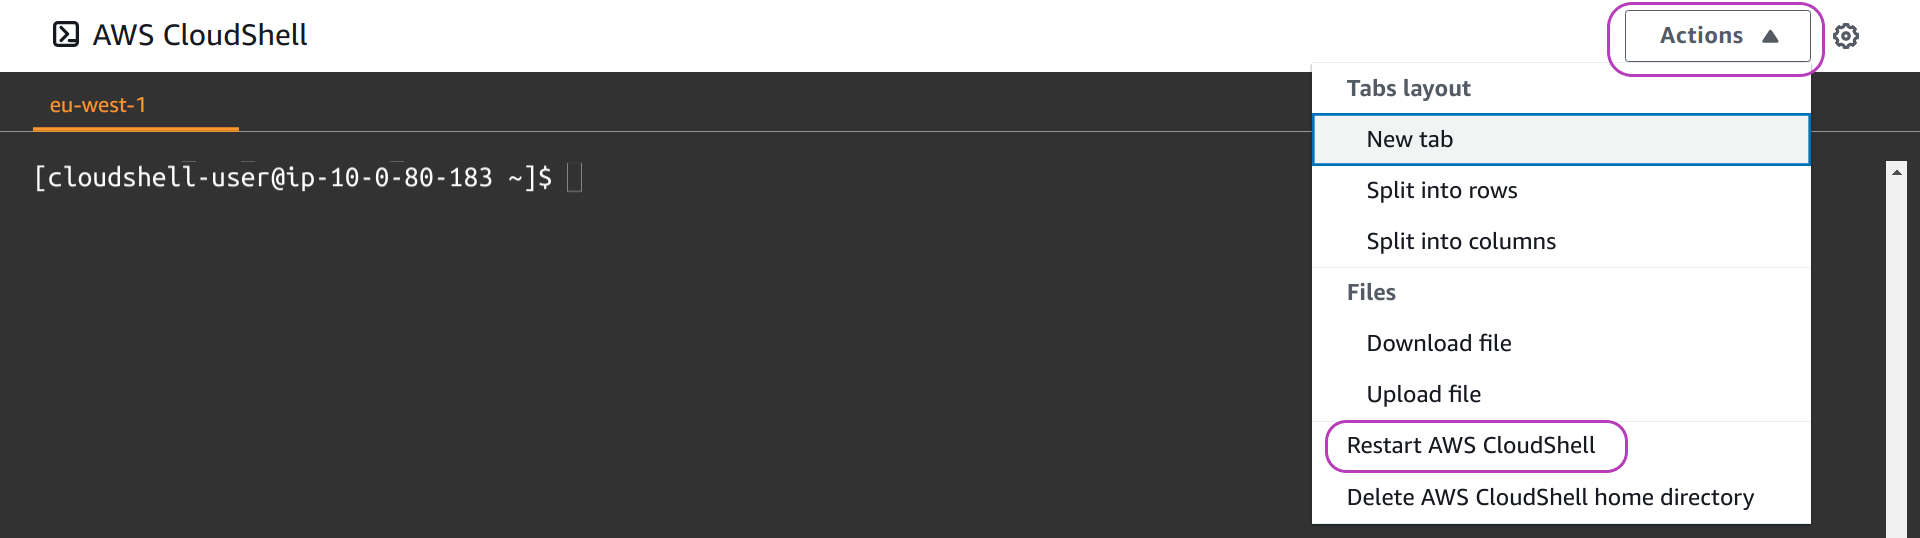
Restarting the AWS CloudShell through that menu is heavyweight in that it will first stop and then relaunch the AWS Linux instance on which the AWS CloudShell terminal runs. It may be useful if you get stuck within a program and you don’t know how to get out (it happened to one of the authors).
Key Points
The AWS CloudShell is a Bash shell terminal that runs in the browser and has the AWS CLI already installed and configured with programmatic access to your AWS account. Hence, only the Scripts need to be installed.
You must be logged in to the AWS Console to launch the AWS CloudShell.
The AWS CloudShell terminal runs on a Linux AWS instance with 1 GB storage.
Data and software you install in your home directory will be deleted after 120 days of not using the AWS CloudShell. You will receive warning emails before they are deleted.
For some applications, the key bindings in the AWS CloudShell may be slightly different to the key bindings for same applications in a desktop/laptop machine.