To take the course Automated Management of AWS Instances you are expected to:
- install Git Bash — Windows users
- install or update Bash — Mac users
- use a laptop or desktop computer with access to the Internet and a browser (such as Chrome) installed
This Setup section provides instructions to install Git Bash on Windows computers and to install or update Bash in Mac computers.
Introduction
The course teaches how to use a set of Bash scripts to manage (create, configure, stop, start and delete) one or multiple AWS instances with a single invocation of a script.
To run the scripts you need to use a terminal that runs the Bash shell. The terminal is a program that enables you to enter textual commands through the keyboard to instruct the operating sytem in your computer the operations you want to be performed such as running a program or copying or deleting files. The terminal is also widely known as the shell and the command-line interface (CLI). In this course we mostly use the term “terminal” and occasionally “shell” and “command line” where more meaningful. Bash stands for Bourne Again Shell. It is a powerful command programming language that was developed to serve as the CLI for the UNIX operating system. Bash is currently the most widely used shell and has a long and interesting history which you can read in the Wikipedia entry for Bash shell.
Linux users don’t need to install any software as the terminal in Linux systems runs Bash by default.
Windows users will need to install Git for Windows on their computer as described below prior to the course. Git for Windows includes Git Bash, a Windows version of the Unix Bash shell, ssh (secure shell) and many other useful programs. ssh is used to login to the AWS instances created with the scripts.
Mac users will need to install or update Bash on their computer as described below. Mac computers usually have installed both the Zsh shell and the Bash shell; and the terminal runs Zsh by default. Zsh and the Bash version usually installed (3.2.57 or so) cannot run the scripts that manage AWS instances. Hence you need to update Bash (the version we updated to in early 2023 was 5.2.15). Note that you can “run” the scripts from a terminal that runs Zsh, but as the first line of each script is this #!/usr/bin/env bash, a Zsh terminal will run Bash to actually run each script.
Install Git Bash (Git for Windows) — Windows users
The steps below correspond to the installation of Git for Windows version 2.33.1 from scratch. The installation of a more recent version, or updating a previously installed version, may show different wording in the screen messages mentioned below or may vary slightly in the number of steps to follow. Choose as many of the options below as possible.
- Click on this link: Git for Windows download page
- Once in that page, click on Download to download the installer.
- Once the installer is downloaded,
- double click on it
- you will then be asked some questions and to select an option for each question.
- each question is shown below in Italics, and the selection to be made is shown in bold
- during the actual installation each question will be displayed at the top of a small window but we are showing only the small window for the question that requires somewhat more help
- the first question is next:
- The app you’re trying to install isn’t a Microsoft-verified app ..?
- Click on Install anyway
- Do you want to allow this app to make changes to your device?
- Click on Yes
- GNU General Public License
- click on Next
- Select Destination Location
- click on Next (don’t change the location shown).
- Select Components
- click on Additional Icons (it will also select “On the Desktop” option)
- then click on Next
- Select Start Menu Folder
- click on Next (don’t change the folder name shown)
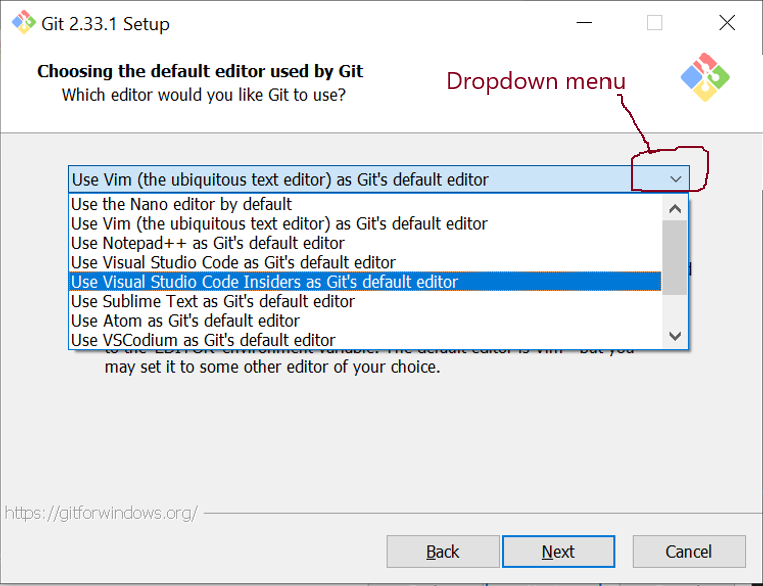
- Choosing the default editor used by Git
- select Use the nano editor by default and click on Next.
- NB: you may need to click on the dropdown menu and to scroll up with the mouse to see this option – see the figure:
- Adjusting the name of the initial branch in new repositories
- keep the selected (or select the) option Let Git decide and click on Next.
- Adjusting your PATH environment
- keep the selected, Recommended option Git from the command line and also from 3rd-party software
- or selec it, and click on Next.
- NB: if this option is not selected, some programs that you need for the course will not work properly. If this happens rerun the installer and select the appropriate option.
- Choosing the SSH executable
- keep the selected (or select the) option Use bundled OpenSSH and click on Next.
- Choosing HTTPS transport backend
- keep the selected (or select the) option Use the OpenSSL library and click on Next.
- Configuring the line ending conversions
- keep the selected (or select the) option Checkout Windows-style, commit Unix-style line endings and click on Next.
- Configuring the terminal emulator to use with Git Bash
- keep the selected (or select the) option Use MinTTy (the default terminal of MSYS2) and click on Next.
- Choose the default behaviour of
git pull
- keep the selected (or select the) option Default (fast-forward or merge) and click on Next.
- Choose a credential helper
- keep the selected (or select the) option Git Credential Manager Core and click on Next.
- Configuring extra options
- keep the selected option (Enable File System Caching) and click on Next.
- Configuring experimental options
- click on Install without selecting any option
- Click on Finish
Run Git Bash by double clicking on the Git Bash icon in your Desktop screen.
Exit Git Bash by pressing the keys
Ctrlandd(Ctrl-d) simultaneously.
Install or update Bash — Mac users
To install or update Bash, open a terminal and enter the
brewcommand in the code box below. You can copy-paste the command but don’t include the dollar sign$.$ brew install bashYou will see an output like the following:
Running `brew update --auto-update`...
==> Downloading https://formulae.brew.sh/api/formula.jws.json
######################################################################## 100.0%
==> Downloading https://formulae.brew.sh/api/cask.jws.json
######################################################################## 100.0%
==> Auto-updated Homebrew!
Updated 1 tap (aws/aws).

==> Fetching bash
==> Downloading https://ghcr.io/v2/homebrew/core/bash/manifests/5.2.15
######################################################################## 100.0%
==> Downloading https://ghcr.io/v2/homebrew/core/bash/blobs/> sha256:05a5f9435c9e9ffe8377b03e0ca6b27bbb32cc
==> Downloading from https://pkg-containers.githubusercontent.com/ghcr1/blobs/> sha256:05a5f9435c9e9ffe8377
######################################################################## 100.0%
==> Pouring bash--5.2.15.monterey.bottle.tar.gz
🍺  /usr/local/Cellar/bash/5.2.15: 162 files, 11.7MB
==> Running `brew cleanup bash`...
Disable this behaviour by setting HOMEBREW_NO_INSTALL_CLEANUP.
Hide these hints with HOMEBREW_NO_ENV_HINTS (see `man brew`).
Check the Bash version installed with the command:
$ bash --versionIf the package manager
brewis not installed in your computer, you can install it with the command below (from the brew website):$ /bin/bash -c "$(curl -fsSL https://raw.githubusercontent.com/Homebrew/install/HEAD/install.sh)"